Skip to content

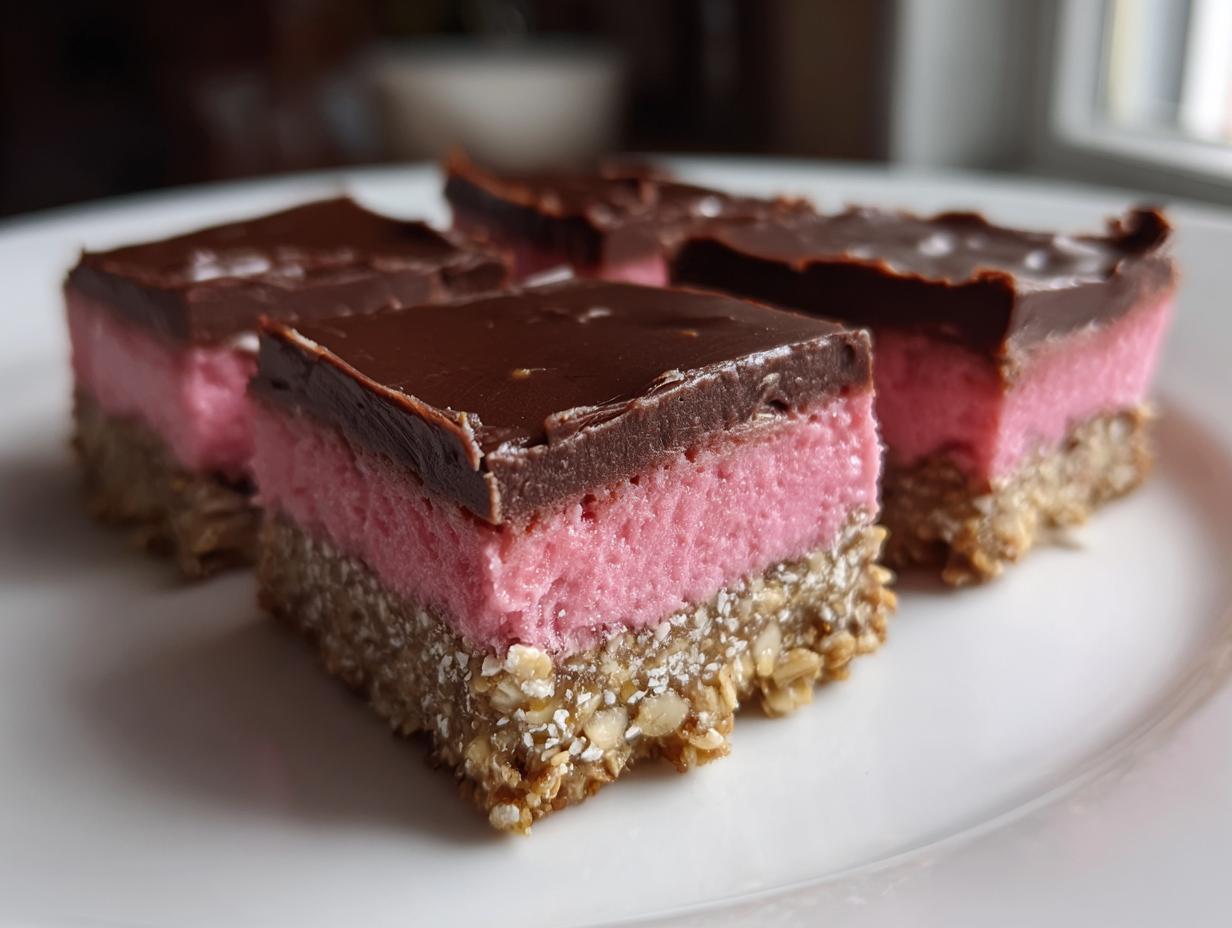
If you’re like me, sometimes you just need a snack that tastes incredible but doesn’t involve turning on the oven for ages. That’s why I’m thrilled to share these Puffed Quinoa & Pistachio Bars with you today! They are crunchy, naturally sweet, and honestly, they taste like a treat, not a health bar.
Hi, I’m Anna! 👩🍳 Cooking is my passion, and here on Mom’s Kitchen I share simple, delicious recipes that bring joy and warmth to your table. Whether you love spending time in the kitchen or you’re just looking for easy ideas for everyday meals, I’m so happy to inspire you with my recipes. Thank you for being part of this flavorful journey! 💛
I believe the best food doesn’t have to be complicated. We need quick wins, especially when life gets busy. These bars use pantry staples mixed with the wonderful crunch of puffed grains and bright pistachios. They come together faster than you can decide what to watch on TV, making them perfect for that afternoon slump or packing in lunch boxes. You won’t believe how satisfying these no-bake bars are!

Author Welcome and Blog Philosophy
I started Mom’s Kitchen because I wanted a place where real home cooks could share simple secrets. I’m not looking for fancy techniques; I’m looking for food that works every single time. My philosophy is that good food should be accessible to everyone, even if you only have fifteen minutes to put something together. Here is a bit more about my approach.
That’s why I adore recipes like these Puffed Quinoa & Pistachio Bars. They require zero baking time, which is a huge win in my book! We focus on real ingredients—dates for sweetness, quality nuts for that perfect bite—so you feel good about what you’re eating. If you want reliable, tasty food without the fuss, you’ve definitely come to the right spot. Stick around, and let’s make something delicious together! 💛
Why You Will Love These Puffed Quinoa & Pistachio Bars
I promise you, these bars don’t mess around when it comes to flavor versus effort. They are the perfect answer when you need a quick snack that satisfies that craving for something sweet and crunchy. Honestly, they are almost too easy, which is why they’ve become a staple around here. They taste like something you bought from a fancy health food store, but you made them yourself in under 25 minutes total!
Quick Assembly and Minimal Effort
The biggest selling point here is definitely the speed. Since these are no-bake bars, you completely skip the preheating and waiting for the oven to cool down. We are just mixing and pressing! That means you can whip these up right after school lets out or when that 3 PM energy crash hits. The food processor does most of the heavy lifting in just a few minutes. You press it into the pan, pour the chocolate on top, and that’s it! Minimal cleanup, maximum reward. It’s the definition of an easy win for any busy weekday.
Gathering Your Ingredients for Puffed Quinoa & Pistachio Bars
Okay, let’s talk about what goes into these incredible Puffed Quinoa & Pistachio Bars. The beauty of this recipe is that it relies on a few core pantry staples, but the quality really shines through. We’re building flavor and texture using dates for binding and natural sweetness, which is so much better than relying on processed sugars. Trust me, having sticky, soft dates ready to go makes the blending step a dream—no struggling with hard, dry fruit!
When you gather your supplies, make sure everything is ready to go. Since this is a no-bake situation, the assembly moves fast once you start blending. We need that perfect combination of crunch from the puffed quinoa and those beautiful green pops from the pistachios. It’s all about balance here, and these simple ingredients work together like magic to create a bar that holds its shape perfectly.
Precise Measurements for Puffed Quinoa & Pistachio Bars
Here is exactly what you need. I always lay everything out on the counter before I even turn on the food processor—it saves so much time!
| Ingredient | Amount | Notes |
|---|---|---|
| Puffed Quinoa | 1 cup | Toast lightly if you want a deeper flavor. |
| Dates | 1½ cups | Must be pitted and soft for blending. |
| Peanut Butter | ⅓ cup | Use creamy for the best paste consistency. |
| Pistachios | ½ cup | Roughly chopped or whole kernels work. |
| Pumpkin Seeds | ¼ cup | Adds extra healthy crunch! |
| Dark Chocolate Chips | ¾ cup | For melting over the top layer. |
Ingredient Notes and Smart Substitutions
I want you to feel confident making these, so let’s address a couple of key points. First, those dates—if they feel hard, soak them in a little hot water for about 10 minutes, then drain them really well before you toss them in the processor. This guarantees that smooth, sticky binder we need. If you skip this step, your base will crumble later, and we absolutely don’t want that!
Second, the nut butter. While peanut butter gives a great classic flavor, if you have an allergy or just want something different, feel free to swap it out. Almond butter works beautifully here, and even sunflower seed butter can take the place of the peanut butter. Just make sure whatever you use is nice and creamy so it blends easily into that date paste. These small adjustments keep the recipe flexible while maintaining that fantastic structural integrity for your final bars.
Essential Equipment for Making Puffed Quinoa & Pistachio Bars
Since this is a no-bake recipe, we keep the equipment list short and sweet, which I love! You absolutely need a good food processor—this is non-negotiable for getting those dates broken down into a smooth, workable paste. Don’t try to use a regular blender unless you want to stand there pushing ingredients down constantly. Also, grab an 8×8 inch baking pan. This size is perfect for getting the right thickness for these Puffed Quinoa & Pistachio Bars. Make sure you line that pan with parchment paper first, leaving some overhang on the sides. That overhang is your handle for lifting the whole slab out later—a lifesaver, trust me!
Step-by-Step Instructions for Perfect Puffed Quinoa & Pistachio Bars
Alright, let’s get this show on the road! Since we aren’t baking anything, the process moves really quickly once you start blending. Be ready to move from one step to the next so everything stays nice and pliable for pressing. If you’re making these on a hot day, maybe chill your chocolate chips for about five minutes before you start blending the base. Every little bit helps when you’re working fast!
Preparing the Base Mixture
First things first: if you decided to toast your puffed quinoa for that extra nutty depth—which I highly recommend—do that while you gather your other ingredients. Pop it in a 350 degree oven for about 5 or 6 minutes until it smells fragrant, then set it aside to cool completely. Don’t skip the cool down, or it might melt your peanut butter binder later!
Now, grab your food processor. Toss in those pitted dates and the peanut butter. You have to process this until it looks like a thick, uniform paste, almost like a rough dough. Scrape down the sides a couple of times to make sure there are no big chunks of date hiding out. It should be sticky and manageable. This paste is what holds our whole bar together, so make sure it looks right before moving on!

Combining and Pressing the Bar Mixture
Once the date paste is looking perfect, dump in your cooled puffed quinoa, your measured pistachios, and those pumpkin seeds. Pulse the processor a few times until everything is just combined. You don’t want to over-process this part; we want to keep the crunch of the nuts and seeds intact! If it looks too dry, add a tiny splash of water, just a teaspoon at a time, until it clumps when you squeeze a handful.
Transfer this entire mixture into your parchment-lined 8×8 pan. Now comes the most important part for structure: pressing! Use the bottom of a flat measuring cup or just your clean hands to press the mixture down *very* firmly and evenly across the bottom of the pan. Get right into the corners. The harder you press now, the less likely your Puffed Quinoa & Pistachio Bars are to crumble when you slice them later. Really pack it in there!
Adding the Chocolate Topping and Setting
Next up is the glorious chocolate layer! Melt your dark chocolate chips gently. I usually do this in short bursts in the microwave, stirring well between each burst so it doesn’t seize up on you. Once it’s smooth and glossy, pour it right over your pressed base. Use an offset spatula to spread it out gently so you don’t accidentally displace the quinoa layer underneath.
That’s it for the active work! Now we wait. Place the whole pan into the refrigerator. You need to let these chill until the chocolate is completely firm and the bars have set up properly. This usually takes at least an hour, but honestly, letting them sit for 90 minutes is safer. Once they are rock solid, use those parchment overhangs to lift the entire block out onto a cutting board. Slice carefully into 12 even pieces. Enjoy that satisfying snap!
Tips for Success with Your Puffed Quinoa & Pistachio Bars
Making no-bake bars can sometimes feel tricky because you rely on stickiness instead of heat to set everything. If you follow these quick tips, you’ll ensure your Puffed Quinoa & Pistachio Bars are perfect every time—not crumbly messes!
First, let’s talk about getting that perfect texture that holds together. The number one mistake people make is not realizing how soft their dates need to be. If your dates are even slightly dry, the base won’t bind properly, and you’ll end up with loose quinoa when you go to cut them. Always check your dates first! If they are stiff, soak them, dry them well, and then blend them until they look almost liquid.
When you press the mixture into the pan, don’t be shy! I really mean it—put some muscle into that pressing step. You are essentially creating the structure right there. Use a heavy, flat object to press down until the surface is completely flat and compacted. This compression is what allows the chocolate top and the date binder to lock everything into place once it chills. A well-pressed bar slices beautifully!

Achieving the Right Texture
If you find your base is just slightly too loose even after pressing, you can always pop the pan back into the freezer for an extra 15 minutes before adding the chocolate. A colder base helps the chocolate set faster and more firmly against it. Also, if you are chopping your pistachios, make sure they aren’t powdery; you want noticeable chunks for that signature crunch in these bars. A good, firm set is the secret to clean cuts!
Frequently Asked Questions About Puffed Quinoa & Pistachio Bars
I know you might have a few questions swirling around, especially since these Puffed Quinoa & Pistachio Bars are so easy! It’s always better to ask before you start mixing, right? Here are a few things folks often wonder about when they make this recipe for the first time. I tried to cover the most common concerns so your snack time is a success!
Can I use a different nut butter in these Puffed Quinoa & Pistachio Bars
Absolutely, you can switch up the nut butter! I mentioned it briefly, but I want to stress that this swap works really well. If you can’t use peanut butter because of allergies, almond butter is my favorite substitute; it has a similar consistency and blends beautifully with the dates. Cashew butter is another creamy option. Just make sure whatever you use is smooth and creamy, not the natural kind that separates a lot, because we need that oil content to help bind everything together when we mix it with the dates.
How long do these no-bake snack bars last
Because these bars rely on dates and not eggs or dairy in the base, they actually keep really well, especially when stored properly. Since they are no-bake, they don’t dry out like baked goods do. If you keep them in an airtight container at room temperature, they are usually great for about four or five days. If you want them to last longer, put them in the fridge! They firm up even more in the cold, and they stay fresh for up to two weeks, which is fantastic for weekly meal prep.
Storing and Reheating Puffed Quinoa & Pistachio Bars
One of the best things about these no-bake snacks is how easy they are to store! Unlike baked goods that can go stale, these Puffed Quinoa & Pistachio Bars rely on sticky dates and chocolate, so they actually get *firmer* and easier to handle the longer they sit. You definitely don’t need to worry about reheating these at all; they are designed to be eaten straight from the fridge or counter.
The key is making sure they are sealed up tight so they don’t absorb any weird fridge smells. I usually cut them into squares immediately after they set up, but if you are making a huge batch, you can store the whole slab uncut until you are ready to slice it. Keep them layered with parchment paper if you stack them, just to make sure that chocolate top doesn’t smear.
| Storage Location | Approximate Freshness | Tip |
|---|---|---|
| Countertop (Airtight) | 4–5 Days | Best if you plan to eat them quickly. |
| Refrigerator (Airtight) | Up to 2 Weeks | Keeps them very firm and prevents softening. |
| Freezer (Wrapped) | Up to 2 Months | Thaw on the counter for 15 minutes before eating. |
Sharing Your Puffed Quinoa & Pistachio Bars Creations
Now that you have these perfectly crunchy, naturally sweet bars ready to go, I can’t wait to hear what you think! Did the chocolate set up beautifully for you? Tell me how long they lasted in your house—I bet they disappeared fast! I love seeing your kitchen successes pop up, so share your photos when you make these simple treats. Contact me if you have any feedback!
Print
Amazing 12 Puffed Quinoa & Pistachio Bars
- Total Time: 21 minutes
- Yield: 12 bars 1x
- Diet: Vegetarian
Description
Make simple no-bake bars with puffed quinoa, pistachios, and dates. These bars offer a satisfying crunch and natural sweetness.
Ingredients
- 1 cup puffed quinoa
- 1½ cups pitted dates
- ⅓ cup peanut butter
- ½ cup pistachios
- ¼ cup pumpkin seeds
- ⅔ cup dark chocolate chips
Instructions
- Optionally toast puffed quinoa at 180°C for 5–6 minutes.
- In a food processor, blend dates and peanut butter into a paste.
- Combine the date paste with quinoa, pistachios, and pumpkin seeds.
- Press the mixture firmly into a prepared pan.
- Melt chocolate and pour it evenly over the bars.
- Chill the bars until firm before cutting them into pieces.
Notes
- For best results, use soft, sticky dates when blending.
- You can substitute another nut or seed butter for peanut butter.
- Toast the quinoa for deeper flavor, if desired.
- Prep Time: 15 minutes
- Cook Time: 6 minutes
- Category: Snack Bar
- Method: No-Bake
- Cuisine: American
Nutrition
- Serving Size: 1 bar
- Calories: Estimate needed
- Sugar: Estimate needed
- Sodium: Estimate needed
- Fat: Estimate needed
- Saturated Fat: Estimate needed
- Unsaturated Fat: Estimate needed
- Trans Fat: Estimate needed
- Carbohydrates: Estimate needed
- Fiber: Estimate needed
- Protein: Estimate needed
- Cholesterol: Estimate needed