Skip to content

If you’re looking for a dinner that looks fancy but actually takes about five minutes of actual work, then you need this apricot glazed chicken recipe in rotation immediately. Hi, I’m Anna! 👩🍳 Cooking is my passion, and here on Mom’s Kitchen I share simple, delicious recipes that bring joy and warmth to your table. Whether you love spending time in the kitchen or you’re just looking for easy ideas for everyday meals, I’m so happy to inspire you with my recipes. Thank you for being part of this flavorful journey! 💛 I promise, these recipes don’t require a culinary degree or hours of prep work. We focus on big flavor using everyday ingredients.
My Journey to Simple, Flavorful Cooking
When I first started cooking for my own family, I thought flavor meant complicated steps. I remember trying to make a fancy chicken dish once, and it ended up dry and tasting like cardboard. What a disaster! I almost gave up on chicken for a whole month.
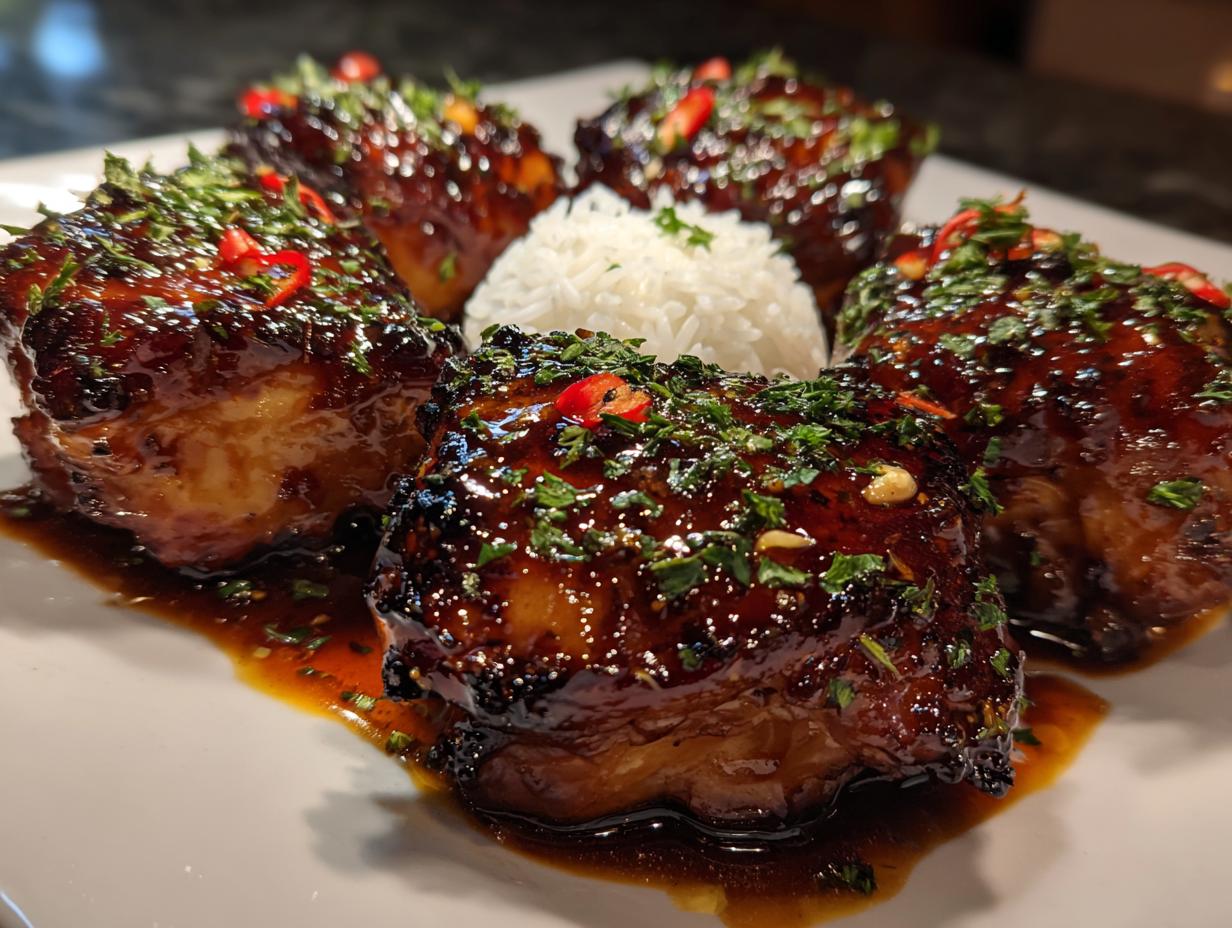
Then I discovered the magic of a good sweet and savory coating. This apricot glazed chicken was my breakthrough moment. Seriously, it’s just four simple things mixed together, brushed on, and baked. It transforms boring chicken breasts into something glossy, juicy, and restaurant-quality. If you think you can’t make beautiful food on a Tuesday night, this recipe is here to prove you wonderfully wrong. It’s quick, it’s forgiving, and the flavor payoff is huge!

Why This apricot glazed chicken is Your New Weeknight Favorite
You know how some recipes look gorgeous but require a million tiny bowls and a sink full of dishes? Not this one! This apricot glazed chicken shines because it’s the definition of high reward for low effort. We’re talking about using just one small bowl to mix the glaze, and the baking tray does all the heavy lifting.
It’s the perfect solution when you need dinner on the table fast but don’t want to settle for bland food. The glossy sheen the apricot gives the chicken is just stunning, making everyone think you spent way more time on it than you actually did. Trust me, this is going straight into your regular rotation!
Quick Prep and Minimal Cleanup
The absolute best part? Prep time clocks in at about ten minutes, tops. You’re just mixing a few pantry staples. Because we bake this entire meal on a lined sheet pan, cleanup is a breeze—usually just tossing the parchment paper away. No splattering oil everywhere, and the chicken cooks evenly because the high heat of the 400-degree oven gets everything done in under half an hour total.
Gathering Ingredients for apricot glazed chicken
Alright, let’s talk about what you need to pull off this incredible apricot glazed chicken. The beauty of this recipe is how few things we actually use. Seriously, check your pantry first—you probably have most of this already! I always make sure to measure everything out before I even turn the oven on. It just keeps the flow going, and nobody wants to scramble for the paprika mid-glaze application!
When you shop, please be specific about what you grab. We aren’t messing around with vague measurements here; we want that perfect, sticky coating every time. Getting these core components right is the difference between good chicken and the best chicken you’ve ever baked!
Essential Components for the Glaze
For that beautiful, sweet, and slightly spicy coating, you need three key flavor boosters. First, grab your apricot preserves—you need exactly three tablespoons. Don’t use jam if you have preserves; the texture is just better for glazing. Next, we bring in the warmth with one teaspoon of paprika and one teaspoon of garlic powder. These are non-negotiable for that gorgeous color and savory undertone.
Finally, a little bit of zip comes from just a quarter teaspoon of black pepper. Measure that out carefully! If you use too much pepper, it starts to overpower the apricot sweetness, and we want balance here.
Selecting the Right Chicken
For the main event, you’ll need four chicken breasts. I always look for breasts that are about six ounces each. If yours are huge, I recommend slicing them horizontally to make two thinner cutlets; that way, they cook faster and absorb the glaze better. The most important preparation step, and please listen to me on this one, is to pat the chicken breasts completely dry with paper towels before they even see the glaze. Excess moisture prevents that beautiful browning and makes the glaze slide right off!
Equipment Needed for Easy apricot glazed chicken
You don’t need a fancy kitchen for this one, thankfully! We keep the tool list super short so you can get this done fast. You will definitely need your oven, of course, set to 400 degrees. Make sure you have a sturdy baking sheet—and line it with parchment paper for the easiest cleanup ever!
The one specialized item you absolutely must have is a silicone pastry brush. This helps you get that gorgeous coat of glaze evenly spread over every surface of the chicken. That’s it—oven, sheet, and brush!
Step-by-Step Instructions for Perfect apricot glazed chicken
Now we get to the fun part—putting it all together! Since this recipe is so fast, try to have all your ingredients measured out before you start. Having everything ready means the process flows smoothly, and you won’t miss that critical first glaze window. We’re aiming for juicy, sticky perfection, and following these steps exactly is how we nail that beautiful apricot glazed chicken every single time.
Preparing the Chicken and Oven
First things first, let’s get the oven hot! Preheat your oven to 400°F. Don’t try to rush this; a hot oven is key for setting that glaze quickly. While it’s heating up, take your four dried chicken breasts and lay them out on your prepared baking sheet. Remember how important it was to pat them dry? Do that again if you need to!
Mixing and Applying the First Glaze Layer
Grab a small bowl—this is where we make the magic happen. Combine your three tablespoons of apricot preserves with the teaspoon of paprika, teaspoon of garlic powder, and the quarter teaspoon of black pepper. Whisk it really well until it looks like a smooth, thick sauce. You’ll notice that paprika immediately gives it a lovely, warm color!
Take about half of that mixture and brush it generously all over the top of the chicken breasts. Don’t be stingy; we want full coverage. Get it right to the edges, but try not to let it drip too much underneath, or it might burn on the pan before the chicken cooks.
Baking and Finishing the apricot glazed chicken
Slide that sheet pan into your preheated 400°F oven. Set a timer for exactly 12 minutes. When that timer goes off, carefully pull the pan out—watch out, it’s hot! Now, take the remaining glaze and brush it evenly over the top of the chicken breasts. This second layer is what builds up that incredible, glossy crust.
Put them back in the oven for another 8 minutes. The internal temperature is the most important thing here, so use a meat thermometer if you have one. Chicken is perfectly safe and juicy when it hits 165°F. If you don’t have a thermometer, look for the juices running clear when you nick the thickest part. Safe internal temperatures are crucial for poultry.
Resting and Serving
Once it hits that temperature, pull the sheet pan out for the final time. This step is non-negotiable for juicy results! Let the apricot glazed chicken rest right there on the pan for just two minutes. This lets the juices redistribute inside the meat instead of running out onto the plate.
After resting, transfer them to your serving plates. For the final flourish, take your two tablespoons of fresh thyme leaves and sprinkle them right over the top. The fresh green against that glossy, deep orange glaze is just stunning. Serve immediately!

Ingredient Notes and Substitutions for Your Glaze
Even though this recipe is simple, the quality of your ingredients really makes a difference in the final flavor profile. I’ve tinkered with this glaze recipe hundreds of times over the years, trying to find the perfect harmony between sweet, savory, and smoky. Don’t panic if you’re missing one tiny thing; we can usually find a great substitute that keeps the spirit of the dish intact.
Remember, baking is chemistry, but weeknight dinners should be flexible! Here are a couple of quick notes on adjusting the spices if you need to.
Paprika Type Considerations
This is where you can really pivot the flavor! I usually call for regular paprika because it’s sweet and gives that beautiful color without being overwhelming. However, if you love a little depth, smoked paprika works wonders here. It adds a subtle, almost barbecue-like smokiness that pairs shockingly well with the apricot.
Just be careful if you use hot paprika; a tiny pinch is all you need, or your lovely dinner might turn into a scorching experience really fast. Stick to sweet or smoked for the best results.
Thyme Alternatives
Fresh thyme is my absolute favorite because it smells so vibrant right before serving. But let’s be real, sometimes you just don’t have it on hand. If you only have dried thyme, you need to scale back significantly. Dried herbs are much more potent than fresh ones. For more information on using dried herbs effectively, you can check out guides on herb potency.
For the two tablespoons of fresh thyme required, use just two teaspoons of dried thyme instead. You can also use a pinch of dried rosemary if you want a different earthy flavor, but I’d start with the dried thyme first. It mixes beautifully into the glaze or you can sprinkle it on at the end.
Tips for Success with Baked Chicken
I’ve learned a few tricks over the years to make sure my baked chicken never turns out dry or has a glaze that slides right off. The biggest mistake people make is skipping the drying step. If the chicken is even slightly damp, that lovely glaze mixture just sits on top of the water instead of sticking to the protein.
Make sure your baking sheet is lined! I know I mentioned parchment paper already, but it’s worth repeating. When the sugars in the glaze start to caramelize, they can stick hard to bare metal. A lined sheet means you’re not scraping burnt sugar bits off your pan for twenty minutes after dinner.
Also, use that meat thermometer! Guessing is what leads to dry chicken. If you get it out right at 165°F internally, you’re golden, especially since we let it rest for those crucial two minutes afterward. That little bit of resting time does wonders for juiciness.
Storing and Reheating Leftover apricot glazed chicken
Even though this apricot glazed chicken disappears quickly, sometimes we’re lucky enough to have leftovers, and we definitely don’t want to ruin that amazing texture in the microwave the next day! The key here is making sure that sweet glaze stays sticky and doesn’t dry out the breast meat. I always pack leftovers up right after dinner, before I even think about cleaning the kitchen.
When you reheat this properly, it tastes almost as good as fresh. Don’t let those delicious bits go to waste! Here’s the quick rundown on how to keep your leftovers happy and moist.
Safe Storage Guidelines
Make sure the chicken has cooled down a bit after dinner, but don’t leave it sitting out for more than two hours. Pop the leftover apricot glazed chicken into a shallow, airtight container. The flatter the container, the faster it cools, which is safer. It will stay perfectly good in your refrigerator for about three to four days. Any longer than that, and you risk the texture getting a little sad.
Reheating Methods That Work Best
Avoid the microwave if you can, because it steams the meat and makes the glaze gummy. The best way to reheat is low and slow in the oven. Pop the chicken in a small, oven-safe dish with just a teaspoon of water or chicken broth at the bottom, cover it tightly with foil, and warm it at 325°F for about 10 to 15 minutes until heated through.
If you’re in a huge rush, you can gently warm it on the stovetop in a non-stick skillet over medium-low heat, flipping once. That stovetop heat keeps the bottom glaze from burning while the inside warms up evenly.
| Storage/Reheating | Method | Time Estimate |
|---|---|---|
| Storage | Airtight Container (Refrigerator) | 3–4 Days |
| Reheating (Best) | Oven (Covered in Foil with Water) | 10–15 Minutes |
| Reheating (Quick) | Stovetop (Medium-Low Heat, Flipped) | 5–7 Minutes |
Frequently Asked Questions About This Recipe
I get so many great questions about this simple baked chicken recipe! It’s wonderful seeing how many of you are trying it out. Most of the questions I receive are about swapping out ingredients or tweaking the texture slightly to fit what you have in your pantry. Don’t worry if you can’t find fresh thyme or if you prefer dark meat; we can usually make it work beautifully.
Here are a few of the most common things folks ask me when they are getting ready to bake their chicken dinner. If you want to know more about my background, check out my About Me page!
Can I Use Chicken Thighs Instead?
Oh yes, absolutely! Chicken thighs are actually fantastic because they are harder to dry out than breasts. If you use boneless, skinless thighs, you might need to add about 5 extra minutes to the total cooking time, since they are often a bit thicker than the 6-ounce breasts we called for. Bone-in thighs will take much longer, probably closer to 35 or 40 minutes total, so keep checking that temperature!
How Can I Make the Glaze Thicker?
If your apricot preserves were a little runnier than usual, or you just prefer a really thick, sticky coating, I have a great trick that doesn’t involve adding any weird thickeners. Right after you mix all your glaze ingredients in that small bowl, before you put half of it on the chicken, just set that bowl on the stove over very low heat for about 60 seconds.
Stir it constantly! The gentle heat will cause the preserves to break down just enough to thicken up beautifully without burning. It won’t get rock hard, but it will coat the back of your spoon much better, which means it will cling beautifully to that baked chicken.
What If I Don’t Have Garlic Powder?
If you’re out of garlic powder, you can substitute it with fresh garlic, but you have to be careful! Fresh garlic burns much faster than the powder does under high heat. For this recipe, I would suggest using one small clove of fresh garlic, minced super fine, and mixing it into the *second* batch of glaze that you apply after the first 12 minutes of baking. That way, it heats through but doesn’t scorch during the initial bake.
Share Your apricot glazed chicken Creations
I absolutely love seeing your beautiful dinners pop up on social media! When you make this easy apricot glazed chicken, please snap a picture and tag me so I can see how shiny and delicious yours turned out. More importantly, leave a rating and a comment right here below the recipe card.
Your feedback helps me know what’s working and what you want to see next on Mom’s Kitchen. Come join our little cooking community—we’re all learning and eating well together! 💛
Print
4 Amazing apricot glazed chicken Secrets
- Total Time: 30 min
- Yield: 4 servings 1x
- Diet: Low Fat
Description
Juicy chicken baked in a sweet apricot glaze with paprika and garlic. Glossy and colorful for dinner plates.
Ingredients
- 4 chicken breasts, 6 oz each
- 3 tablespoons apricot preserves
- 1 teaspoon paprika
- 1 teaspoon garlic powder
- 1/4 teaspoon black pepper
- 2 tablespoons fresh thyme
Instructions
- Preheat oven to 400°F. Pat chicken dry and place on lined sheet.
- Mix apricot preserves, paprika, garlic powder, black pepper.
- Brush half glaze on chicken.
- Bake 12 minutes, brush remaining glaze.
- Bake 8 more minutes until 165°F.
- Rest 2 minutes, sprinkle thyme, serve.
Notes
- Cook chicken to 165°F for safety.
- Prep Time: 10 min
- Cook Time: 20 min
- Category: Main Course
- Method: Baking
- Cuisine: American
Nutrition
- Serving Size: 1 breast
- Calories: 300
- Sugar: Not specified
- Sodium: Not specified
- Fat: 12 g
- Saturated Fat: Not specified
- Unsaturated Fat: Not specified
- Trans Fat: Not specified
- Carbohydrates: 10 g
- Fiber: Not specified
- Protein: 32 g
- Cholesterol: Not specified