Skip to content

Hi, I’m Anna! 👩🍳 Cooking is my passion, and here on Mom’s Kitchen I share simple, delicious recipes that bring joy and warmth to your table. Whether you love spending time in the kitchen or you’re just looking for easy ideas for everyday meals, I’m so happy to inspire you with my recipes. Thank you for being part of this flavorful journey! 💛
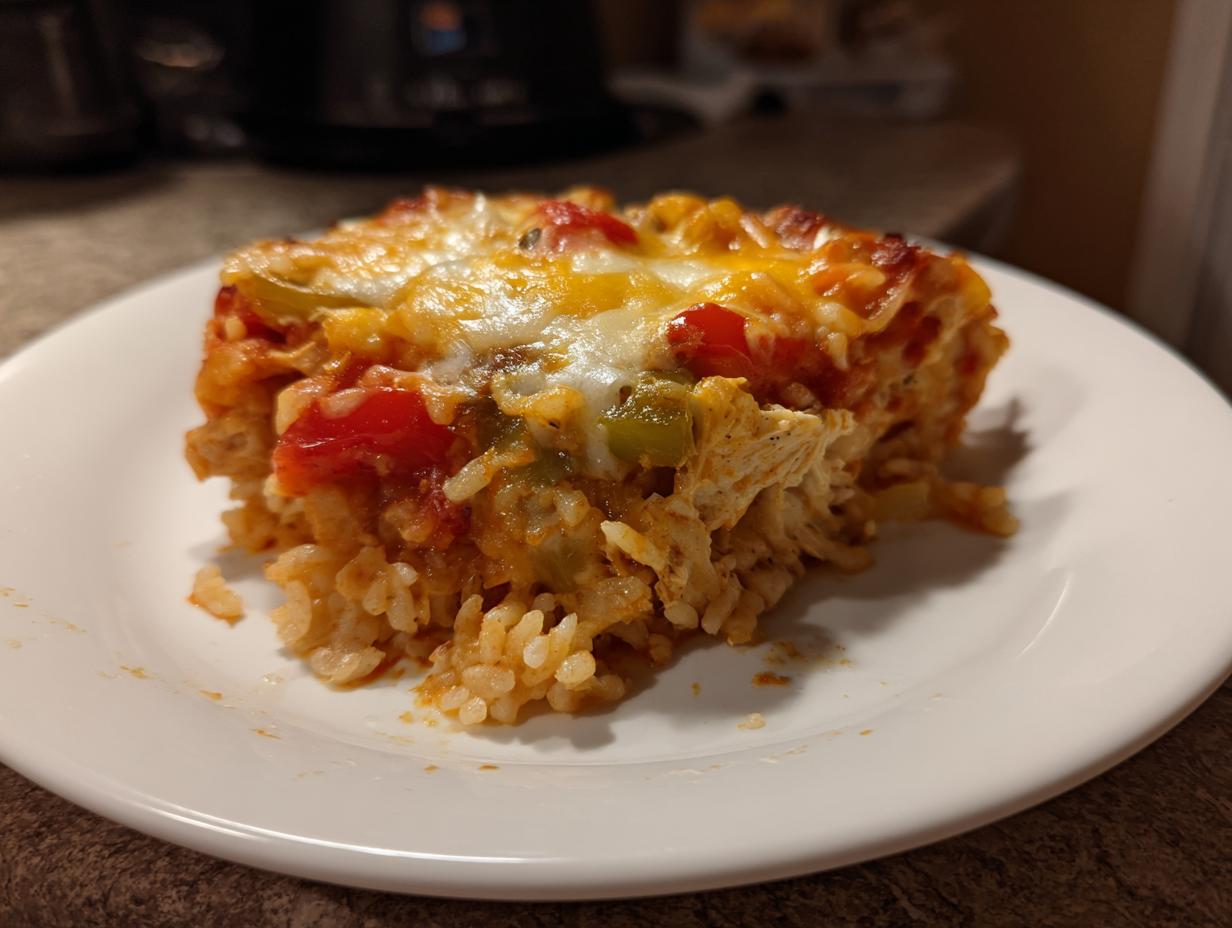
Are you tired of scraping together complicated meals when you only have thirty minutes before everyone starts asking what’s for dinner? I totally get it. That’s why I’m obsessed with recipes that taste like they took hours but actually come together faster than ordering takeout. This **Chicken Bubble Up Bake** is the absolute champion of easy weeknight dinners in my house.
When I first started cooking for my own family, I needed food that was forgiving—you know, recipes where a little mistake doesn’t ruin the whole thing. This bake is that safety net! It’s creamy, it’s cheesy, and the soft biscuit pieces soak up all that savory goodness. It’s pure comfort food that requires basically zero fancy skills. Trust me, if you can shred chicken and open a can of soup, you can nail this recipe perfectly on your very first try. It’s become my go-to guarantee for happy faces at the dinner table.

Why You’ll Love This Chicken Bubble Up Bake
I’ve made this casserole more times than I can count, and every time, it disappears fast! It’s the definition of a crowd-pleaser that doesn’t stress you out. Honestly, the convenience factor alone is a game-changer for busy weekdays.
- It’s lightning fast! With only about 15 minutes of prep time, you can get this **Chicken Bubble Up Bake** into the oven before the kids even finish setting the table.
- The texture is just unreal—soft, doughy biscuits nestled under a creamy, cheesy sauce. It’s like a hug in a casserole dish!
- It uses pantry staples, so you don’t need a special grocery run every time you crave comfort food.
- It’s incredibly forgiving. If you mess up the mixing just a tiny bit, this bake forgives you completely.
Essential Equipment for Your Chicken Bubble Up Bake
You don’t need a whole arsenal of fancy gadgets for this recipe, which is another reason I love it so much! We’re keeping things simple, so grab these few basics:
- A standard 9×13 inch baking dish.
- One medium mixing bowl for the creamy chicken mixture.
- One small bowl for assembling that delicious topping.
- A sturdy spoon or spatula for mixing and spreading everything evenly.
Ingredients for the Ultimate Chicken Bubble Up Bake
Getting the right measurements here is key, but don’t stress about perfection—this is a forgiving dish! We’re building layers of flavor, starting with the chicken and moving straight into that ridiculously creamy sauce base. When you look at the list, you’ll notice everything comes together quickly, which is exactly what we want for a fast dinner.
Here’s what you need to gather for the best **Chicken Bubble Up Bake** you’ve ever made:
- 2 cups cooked, fully shredded chicken breast (Don’t use raw, trust me!)
- 1/2 cup nonfat sour cream (This adds the perfect tang!)
- 1 can (10.5 oz) cream of chicken soup (The backbone of the sauce!)
- 1 tablespoon ranch seasoning mix (This is where the flavor pops!)
- 2 green onions, finely chopped (We’re splitting these up later, so chop them all now.)
- 3/4 cup shredded cheddar or Colby Jack cheese (Use the good stuff, it melts better!)
- 1/2 cup real bacon bits (The crunch factor is important here.)
- 1 can (7.5 oz) refrigerated buttermilk biscuits, cut into small pieces (About four small pieces per biscuit.)
Ingredient Clarity and Preparation Notes
The most important thing to note is the chicken. You absolutely must use **cooked and shredded chicken** for this **Chicken Bubble Up Bake**. If you try to bake raw chicken in this mixture, it won’t cook evenly, and your biscuits will end up soggy before the center is done. I usually grab a rotisserie chicken to save time, or I’ll use leftover baked chicken breasts. It has to be completely cooked before it hits the dish!
Also, make sure you chop those green onions completely before you start mixing. You need half for the creamy layer and the other half reserved for sprinkling over the cheese later. That second sprinkle adds a fresh bite right when the cheese is perfectly melted. Don’t skip that little step; it makes a huge difference in the final presentation!
Step-by-Step Instructions for Making the Chicken Bubble Up Bake
Okay, now for the fun part! This is where everything comes together so easily. Seriously, don’t let the multiple steps scare you; they are all super quick. We are going to build this casserole in two stages—a creamy base, then the cheesy, bubbly topping. Remember, we want the biscuits to get fluffy and the chicken mixture to heat through before we add that gorgeous cheese layer.
Preparing the Base Layers of the Chicken Bubble Up Bake
First things first, get your oven on the job! We need it nice and hot, so go ahead and preheat that oven to 350°F. While it’s warming up, grab your 9×13 inch baking dish and give it a quick spray with non-stick cooking spray. This is important because we don’t want any sticky surprises later when we try to scoop out those fluffy bites.
Next, we tackle the creamy sauce. In your medium mixing bowl, toss in that cooked, shredded chicken. Add the cream of chicken soup, the nonfat sour cream, and that ranch seasoning mix. Now, take about half of your finely chopped green onions and stir everything together until it’s looking smooth and beautifully combined. You want every piece of chicken coated in that savory sauce!
In your smaller bowl, this is where we prep the topping magic. Mix together the shredded cheese, the real bacon bits, and the remaining half of the green onions. Give that a quick stir and set it aside on the counter. Don’t put it in the fridge; we need it ready to go!
Time to layer! Take your can of refrigerated buttermilk biscuits. You need to cut each biscuit into about four small, bite-sized pieces. Don’t worry about them being perfect squares—rustic chunks are better for soaking up the sauce! Spread these biscuit pieces out evenly across the bottom of your prepared baking dish. Try to get them covering the entire bottom surface.
Finally for the base, pour that creamy chicken mixture evenly over the biscuit layer. Use your spoon or spatula gently to spread it out so that all those biscuit chunks get covered. This ensures everything bakes up soft and tender. We are now ready for the first bake!
Baking and Finishing the Cheesy Chicken Bubble Up Bake
Slide that dish into the preheated oven. We’re going to bake this uncovered for 20 minutes. This initial bake is crucial because it gives the biscuits time to start puffing up and absorbing the moisture from the sauce without burning the cheese topping.
When the timer goes off after 20 minutes, pull the **Chicken Bubble Up Bake** out carefully—it’s going to be hot! Now, grab that topping mixture you set aside earlier. Sprinkle that cheese, bacon, and onion blend evenly right over the top of the hot chicken mixture. Make sure you get good coverage across the entire surface.
Back into the oven it goes! This second round is shorter. Bake it uncovered for another 15 minutes. You are looking for that cheese to be completely melted, golden brown around the edges, and gloriously bubbly. That’s the sign that it’s done!
Once it’s bubbling, take it out. And here’s a non-negotiable step: let it rest! I know it smells amazing, but you need to let the **Chicken Bubble Up Bake** sit on the counter for about 5 minutes. This resting time allows the sauce to set up just a little bit, so when you scoop it out, it holds its shape better instead of running all over the plate.
Serve it warm with a side salad or some steamed veggies, and watch it disappear. Enjoy!

Tips for Success with Your Chicken Bubble Up Bake
I’ve learned a few things over the years making this casserole, and these little tricks keep my **Chicken Bubble Up Bake** perfect every time. The biggest worry people have is soggy biscuits, but we can avoid that easily!
Make sure your base sauce isn’t too watery before you pour it over the biscuit pieces. If your sour cream or soup seems runnier than usual, just add a tiny bit more ranch seasoning or a tablespoon of flour to thicken it up slightly. This ensures the biscuits absorb flavor, not just liquid. For more general tips on thickening sauces, you might find this culinary guide helpful.
Also, don’t skip that 20-minute initial bake! That time is essential for giving the biscuit dough a head start on cooking before that heavy cheese topping goes on. If you put the cheese on right away, the biscuits underneath might stay dense and doughy. Patience during that first stage pays off big time for a light, fluffy texture!
Storing and Reheating Leftover Chicken Bubble Up Bake
Oh, leftovers! This bake is just as good the next day, provided you treat it right. The secret to keeping those biscuit pieces from getting totally mushy later is how you reheat it. You don’t want to blast it in the microwave if you can help it; that changes the texture of the biscuits real fast.
If you cover it tightly, it keeps wonderfully in the fridge for a few days. When you reheat, the oven is always my first choice to bring back some of that golden crust and bubbly cheese goodness. If you are interested in learning more about safe food storage practices, checking out official guidelines from a public health resource is always a good idea.
Storage and Reheating Guide Table
| Condition | Duration | Best Reheating Method |
|---|---|---|
| Refrigerated | 3 to 4 days | Cover loosely with foil and bake at 350°F for 15 minutes, or until heated through. |
| Frozen | Up to 2 months | Thaw overnight in the fridge, then bake covered at 350°F for 25-30 minutes. |
Frequently Asked Questions About the Chicken Bubble Up Bake
I get so many lovely messages asking for little tweaks or clarifications, and I’m happy to answer them here! It just shows how many of you are whipping up this comfort food in your own kitchens. Don’t hesitate to reach out if you have another question after reading these! You can always contact me directly if you need more help.
Can I make this Chicken Bubble Up Bake ahead of time?
Yes, you absolutely can assemble the entire **Chicken Bubble Up Bake** ahead of time! Just follow all the steps up until the first bake (Step 5). Cover the assembled dish tightly with plastic wrap—maybe even add a layer of foil for extra protection—and stick it in the fridge for up to 24 hours. When you’re ready to cook, pull it out about 30 minutes before baking just to take the chill off, then proceed with the initial 20-minute bake time. You might need to add 5 extra minutes to the final baking time since it started cold!
What kind of chicken works best for this easy weeknight dinner?
For this **easy weeknight dinner**, the best chicken is already cooked chicken! Seriously, anything that saves you time is a win here. I rely on rotisserie chicken more often than not because the meat is already seasoned and perfectly tender. Canned, drained chicken works in a pinch, but I find rotisserie gives you a much better flavor profile and texture for this casserole.
Can I substitute the biscuits in this creamy chicken bake?
That’s a tough one! The soft, doughy texture of the biscuits is what makes this dish what it is—it soaks up the creamy sauce beautifully. If you absolutely can’t find refrigerated biscuits, you could try using frozen puff pastry cut into small squares, but you’ll need to adjust your baking time significantly, as it cooks much faster. For the best results that mimic the original, stick to the canned biscuits; they are essential for that classic bubbly texture in this **creamy chicken bake**.
Share Your Chicken Bubble Up Bake Creations
I pour my heart into sharing these simple, comforting recipes with you all, and I truly love hearing about your successes! If you tried this **Chicken Bubble Up Bake** and it brought some joy to your dinner table, please come back and leave a rating. Let me know how it went in the comments below, and if you snapped a picture of that beautiful, cheesy casserole, tag me on social media! I can’t wait to see your bubbly creations! For more about my mission here, check out my About Me page.
Print
Amazing 15 Min Chicken Bubble Up Bake
- Total Time: 50 minutes
- Yield: 6 servings 1x
- Diet: Vegetarian
Description
A creamy, cheesy chicken bubble up bake loaded with green onions and bacon bits, perfect for an easy family dinner. This bake features tender chicken, soft biscuit pieces, and a savory, cheesy topping.
Ingredients
- 2 cups cooked, shredded chicken breast
- 1/2 cup nonfat sour cream
- 1 can 10.5 oz cream of chicken soup
- 1 tbsp ranch seasoning mix
- 2 green onions, finely chopped (half for mixture, half for topping)
- 3/4 cup shredded cheddar or Colby Jack cheese
- 1/2 cup real bacon bits
- 1 can 7.5 oz refrigerated buttermilk biscuits, cut into small pieces
Instructions
- Preheat oven to 350°F and lightly spray a 9×13 inch baking dish with cooking spray.
- In a medium bowl, combine shredded chicken, cream of chicken soup, sour cream, ranch seasoning, and 1/2 of the chopped green onions. Mix until smooth.
- In a small bowl, combine cheese, bacon bits, and remaining green onions. Set aside.
- Spread biscuit pieces evenly across the bottom of the prepared baking dish.
- Pour the chicken mixture evenly over the biscuits, spreading to cover completely.
- Bake uncovered for 20 minutes.
- Remove from oven and evenly sprinkle the cheese, bacon, and green onion topping over the chicken mixture.
- Return to oven and bake uncovered for an additional 15 minutes until cheese is melted and bubbly.
- Remove from oven and let sit for 5 minutes before slicing.
- Serve warm and enjoy.
Notes
- Ensure the chicken is fully cooked to an internal temperature of 165°F before assembling the bake.
- Prep Time: 15 minutes
- Cook Time: 35 minutes
- Category: Dinner
- Method: Bake
- Cuisine: American
Nutrition
- Serving Size: 1 serving
- Calories: 315
- Sugar: Unknown
- Sodium: Unknown
- Fat: 10g
- Saturated Fat: Unknown
- Unsaturated Fat: Unknown
- Trans Fat: Unknown
- Carbohydrates: 25g
- Fiber: Unknown
- Protein: 28g
- Cholesterol: Unknown