Skip to content

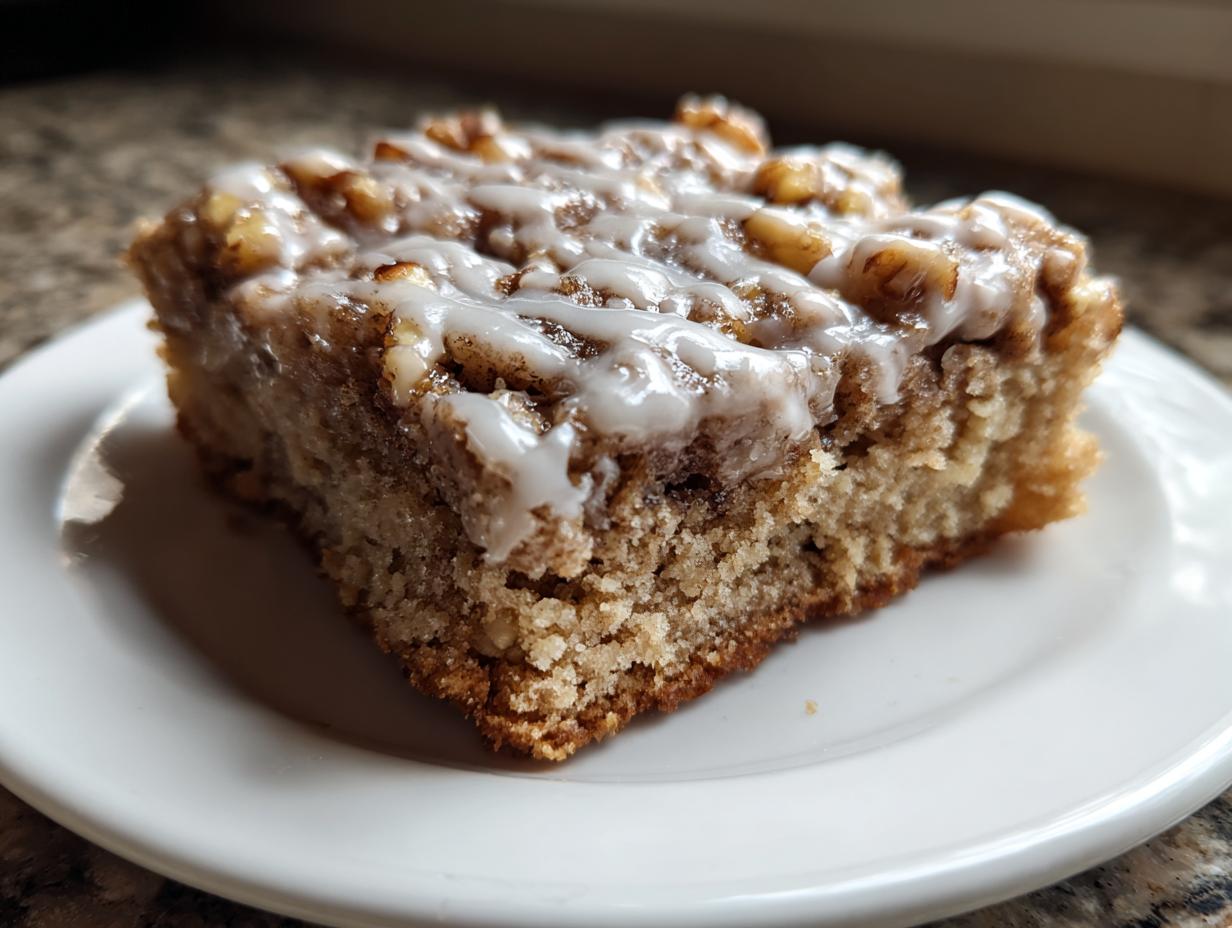
Hi, I’m Anna! 👩🍳 Cooking is my passion, and here on Mom’s Kitchen I share simple, delicious recipes that bring joy and warmth to your table. If you’re looking for straightforward recipes that taste absolutely amazing, you’ve come to the right place. Whether you love spending time in the kitchen or you’re just looking for easy ideas for everyday meals, I’m so happy to inspire you with my recipes. We’re diving into the ultimate comfort bake today: Chocolate Chip Cookie Bars! Forget fussy scooping; these bars are the easy, chewy answer to your cookie cravings, topped with the most beautiful sweet glaze.
I started this blog because I truly believe good food doesn’t have to be complicated. My goal is to help you build confidence in your own kitchen, making sure that every recipe you try turns out perfectly, just like this one. These bars are proof that simple ingredients, mixed right, yield spectacular results. Thank you for being part of this flavorful journey! 💛
Why You Will Love These Chocolate Chip Cookie Bars
These aren’t just any dessert squares; they are everything you love about a classic chocolate chip cookie, only better because they are baked together in one pan! Trust me, once you try this technique, you won’t go back to dropping individual dough balls.

- They are incredibly fast to throw together—the prep time is barely 15 minutes!
- The texture is perfectly chewy and soft in the center, never dry or cakey.
- The simple powdered sugar glaze adds just the right amount of sweetness without being complicated.
- These Chocolate Chip Cookie Bars are the easiest way to feed a crowd!
Essential Ingredients for Perfect Chocolate Chip Cookie Bars
Alright, let’s talk ingredients! For these Chocolate Chip Cookie Bars to achieve that perfect chewy center and crisp edge, precision matters just a tiny bit more than when we’re just whipping up a quick dinner. Don’t panic, though; these are all pantry staples! I’ve laid out exactly what you need below, but pay close attention to how you measure the dry stuff and the state of your wet ingredients. That’s where the magic happens, or where things can go a little sideways if you aren’t careful.
Dry Ingredients Breakdown
We keep this simple: flour, baking soda, and salt. When measuring the flour, please do not scoop it directly out of the bag with your measuring cup! That packs it in way too tight, and your bars will turn out dense and hard. Instead, spoon the flour lightly into the measuring cup and then level it off with a straight edge. Baking soda is non-negotiable—it’s what gives us that little bit of lift we need for the bar structure.
Wet Ingredients and Binders
This is where we build flavor and moisture. We use melted butter, which is easier than creaming softened butter, and dark brown sugar for that rich, molasses flavor that makes cookies taste homemade. The crucial binder here is the egg. Remember that note on the recipe card? You absolutely must use a room temperature egg! A cold egg doesn’t incorporate as smoothly into the melted butter and sugar, and it can cause the batter to curdle slightly. Just let it sit on the counter for 30 minutes before you start mixing.
The Chocolate Component
We need chocolate in two forms for these bars, so make sure you buy enough! You’ll need a full cup of standard chocolate chips mixed right into the batter. These melt slightly during baking, creating those wonderful pockets of gooey chocolate. Then, you need that last quarter cup reserved specifically for melting down later to drizzle across the top. Using two separate batches ensures you get that lovely melted ribbon effect on the finished product.
Preparing Your Chocolate Chip Cookie Bars Batter
Now that we have our ingredients prepped and measured just right, it’s time to bring them together! Making these Chocolate Chip Cookie Bars is so satisfying because the batter comes together incredibly fast, provided you follow one key rule: do not overmix! Overmixing is the enemy of chewiness. When you mix flour too much, you develop the gluten strands, which results in a tough, cakey bar instead of the soft, dense treat we are aiming for.

Mixing Wet and Dry Components
First things first, we combine the dry ingredients—the flour mixture—into the wet ingredients—the buttery, sugary base. You want to do this in stages, not all at once! Add about half of your dry mixture into the bowl with the melted butter, egg, and vanilla. Mix it gently with a spatula or a wooden spoon until you see just a few small streaks of flour remaining. Don’t try to make it perfectly smooth! Then, add the rest of the dry ingredients and mix only until everything is *just* incorporated. I mean it—stop mixing the second you don’t see any more dry patches. This gentle handling ensures those air pockets we created earlier stay intact, leading to that fantastic, tender texture in the finished bars.
Folding in the Chips
The main chocolate chips go in last, after the dry and wet have just met. We always fold these in, never beat them in. Take your cup of chips and gently fold them into the batter using your spatula, turning the batter over itself. This is called folding, and it’s a technique that keeps the volume in your batter high. You’re just distributing them evenly throughout the dough. Once they look spread out, stop immediately! That batter is ready for the pan, and we’ve protected its structure perfectly.
Baking the Chocolate Chip Cookie Bars to Perfection
The moment of truth! Before we even think about mixing that batter, make sure your oven is preheated to 350°F (175°C). Getting the temperature right is key to even baking. Also, don’t forget to prep your baking dish—I usually line mine with parchment paper, letting a little overhang on the sides so I can lift the whole slab out later. It saves so much scraping and mess!
Once the batter is spread evenly, slide it into the hot oven. The recipe calls for 25 to 30 minutes, but this is where you need to be vigilant if you want those perfect chewy Chocolate Chip Cookie Bars. The biggest mistake people make is leaving them in too long trying to get them golden brown all over. We want golden brown edges, yes, but the center should still look a little soft when you pull them out.
Trust me on this: these bars continue to cook on the hot pan after you remove them from the oven. If you wait until the middle looks completely firm, you’ll end up with dry, cakey bars. Look for the edges to be set and slightly golden, and the center should look mostly opaque but still slightly sunken. That residual heat is what finishes the baking process perfectly for maximum chew!
Crafting the Simple Sweet Glaze Topping
While the bars are cooling down—and you absolutely must let them cool a bit first, or the glaze will just melt right off—it’s time to make the topping! This simple sweet glaze is what takes these already amazing Chocolate Chip Cookie Bars from great to truly irresistible. It’s so easy, but it adds that professional, bakery-style finish we all love.
For the glaze base, you just need powdered sugar and milk. Start with the half cup of powdered sugar, and then slowly whisk in just two tablespoons of milk. You want a consistency that is thick enough to coat the back of a spoon but still pourable. If it looks too thick, add milk just a tiny bit at a time—we don’t want soup! If you accidentally go too thin, just whisk in a tiny puff more of powdered sugar until it firms up again. It’s forgiving, I promise.

Assembling the Final Layers
Once the bars have cooled down for maybe 15 minutes—they can still be slightly warm, but not piping hot—you can start assembling the final look. Gently spread that white sugar glaze we just made evenly over the surface of the cookie bars. Don’t press hard; just let it settle on top.
Now for the final flourish! Take that last quarter cup of chocolate chips you reserved. Melt them gently—I usually do this in the microwave in 15-second bursts, stirring well between each burst so they don’t scorch. Once they are smooth and glossy, grab a fork or a small spoon and drizzle that melted chocolate back and forth across the white glaze. Seeing those ribbons of dark chocolate on the pale background is just the best part of making these Chocolate Chip Cookie Bars!
Tips for Achieving Expertly Chewy Chocolate Chip Cookie Bars
Getting that perfect, slightly gooey, wonderfully chewy center in your Chocolate Chip Cookie Bars is what separates a good bar from an absolutely legendary one! It all comes down to how you handle the ingredients and how you treat the dough in the oven. I’ve tweaked this recipe so many times, and these few tips are the non-negotiables that guarantee that melt-in-your-mouth texture every single time you bake them.
Ingredient Temperature and Mixing Secrets
If you remember one thing from this whole recipe, let it be this: that egg needs to be room temperature! Seriously, don’t skip that step. A cold egg shocks the melted butter and sugar mixture, which prevents everything from emulsifying properly. When the batter isn’t smooth, you end up fighting it when you add the flour, which leads to overmixing. So, room temp egg equals smooth start, which equals less mixing, which equals maximum chewiness in your final bar!
Avoiding the Overbaked Bar
We talked about this earlier, but it bears repeating because it’s the final texture killer! When you check these bars around the 25-minute mark, you are looking for visual cues, not dryness. The edges should look nicely set and just starting to deepen in color, but the center must still look slightly soft or underdone when you pull the pan out. If you wait until the center looks completely baked through in the oven, I promise you, they will be dry by the time they cool down on the counter. Resist the urge to wait for that extra golden color!
Storing and Reheating Your Chocolate Chip Cookie Bars
The hardest part about making these amazing Chocolate Chip Cookie Bars is usually not eating them all in one sitting! Luckily, they store really well, which means you can make a batch on Sunday and still have treats for lunch boxes later in the week. Because of that lovely glaze and the melted chocolate on top, you do need to be a little thoughtful about how you keep them fresh. The key is keeping them airtight so they don’t dry out or get sticky from the fridge air.
If you’ve added the glaze, I generally don’t recommend leaving them out at room temperature for more than a day, especially if your kitchen is warm. For longer storage, the fridge is your best friend. They firm up a little when chilled, but they soften right back up when you let them sit on the counter for 15 minutes before serving. If you want to learn more about proper food storage techniques, you can check out resources on food safety guidelines.
Storage and Freshness Table
Here’s my quick guide for keeping your leftovers perfect:
| Storage Method | Container Type | Duration |
|---|---|---|
| Room Temperature | Airtight container | Up to 1 day |
| Refrigerated | Airtight container (layer bars with parchment) | Up to 5 days |
| Freezing | Freezer-safe bag or container | Up to 3 months |
Frequently Asked Questions About Chocolate Chip Cookie Bars
I know you might have a few lingering questions before you jump into baking, especially if you’re trying to perfect the texture of these Chocolate Chip Cookie Bars. It’s totally normal! When you’re dealing with a recipe that relies on that perfect balance between gooey and set, sometimes you need a little extra reassurance. Here are the questions I get asked most often about getting these classic dessert bars just right. If you have other questions, feel free to reach out to me!
Can I use a different type of chocolate in these cookie bars?
Oh, absolutely! While I love the classic milk chocolate chip for that nostalgic flavor, feel free to substitute! You can use semi-sweet chips in the bar batter for a richer flavor, or even mix in some white chocolate or butterscotch chips if you’re feeling adventurous. For the melted drizzle on top, dark chocolate works beautifully if you prefer less sweetness. Just make sure whatever you use melts smoothly!
How do I know when my cookie bars are truly done?
This is the million-dollar question for chewy results! You are looking for the edges to be golden brown and set, but the center should still look slightly soft and maybe even a tiny bit underdone when you pull the pan out of the oven at the 25-30 minute mark. If you wait until the center looks completely dry, they will inevitably be too firm once they cool. Remember, they keep cooking on that hot pan!
Why are my bars crumbly instead of chewy?
Usually, crumbly bars are a sign of one of two things, both related to moisture. First, check your baking time—if you baked them too long, all that moisture evaporated. Second, check your flour measurement. If you packed the flour in, the dough didn’t have enough moisture to support it, leading to a dry, crumbly texture. Always spoon and level your flour for the best results with these bars! Understanding the science behind baking, like the role of gluten development, can really help prevent these issues; you can read more about that on Serious Eats.
Print
Amazing! 9 Secret Chocolate Chip Cookie Bars
- Total Time: 45 minutes
- Yield: 12-16 bars 1x
- Diet: Vegetarian
Description
Make chewy chocolate chip cookie bars with a simple sweet glaze topping.
Ingredients
- 1½ cups all-purpose flour
- ½ teaspoon baking soda
- ¼ teaspoon salt
- ½ cup unsalted butter (melted)
- ¾ cup brown sugar
- 1 egg
- 1 teaspoon vanilla extract
- 1 cup chocolate chips (for bars)
- ½ cup powdered sugar (for topping)
- 2 tablespoons milk (for topping)
- ¼ cup chocolate chips (melted, for topping)
Instructions
- Preheat your oven to 350°F (175°C). Prepare your baking dish.
- Mix the flour, baking soda, and salt in a bowl.
- In a separate bowl, combine the melted butter, brown sugar, egg, and vanilla extract. Mix well.
- Add the dry ingredients to the wet ingredients. Mix until just combined.
- Fold in 1 cup of chocolate chips.
- Spread the batter evenly into your prepared baking pan.
- Bake for 25–30 minutes until the edges are golden brown.
- While the bars cool slightly, mix the powdered sugar and milk for the topping.
- Spread the sugar mixture lightly over the bars.
- Drizzle with the melted ¼ cup of chocolate chips.
Notes
- Use room temperature egg for better mixing.
- Do not overbake to keep the bars chewy.
- Melt the topping chocolate chips in short bursts in the microwave.
- Prep Time: 15 minutes
- Cook Time: 30 minutes
- Category: Dessert
- Method: Baking
- Cuisine: American
Nutrition
- Serving Size: 1 bar
- Calories: Approx. 250
- Sugar: Approx. 25g
- Sodium: Approx. 100mg
- Fat: Approx. 14g
- Saturated Fat: Approx. 8g
- Unsaturated Fat: Approx. 6g
- Trans Fat: 0g
- Carbohydrates: Approx. 30g
- Fiber: Approx. 1g
- Protein: Approx. 3g
- Cholesterol: Approx. 30mg