Skip to content

Hi, I’m Anna! 👩🍳 Cooking is my passion, and here on Mom’s Kitchen I share simple, delicious recipes that bring joy and warmth to your table. Whether you love spending time in the kitchen or you’re just looking for easy ideas for everyday meals, I’m so happy to inspire you with my recipes. Thank you for being part of this flavorful journey! 💛
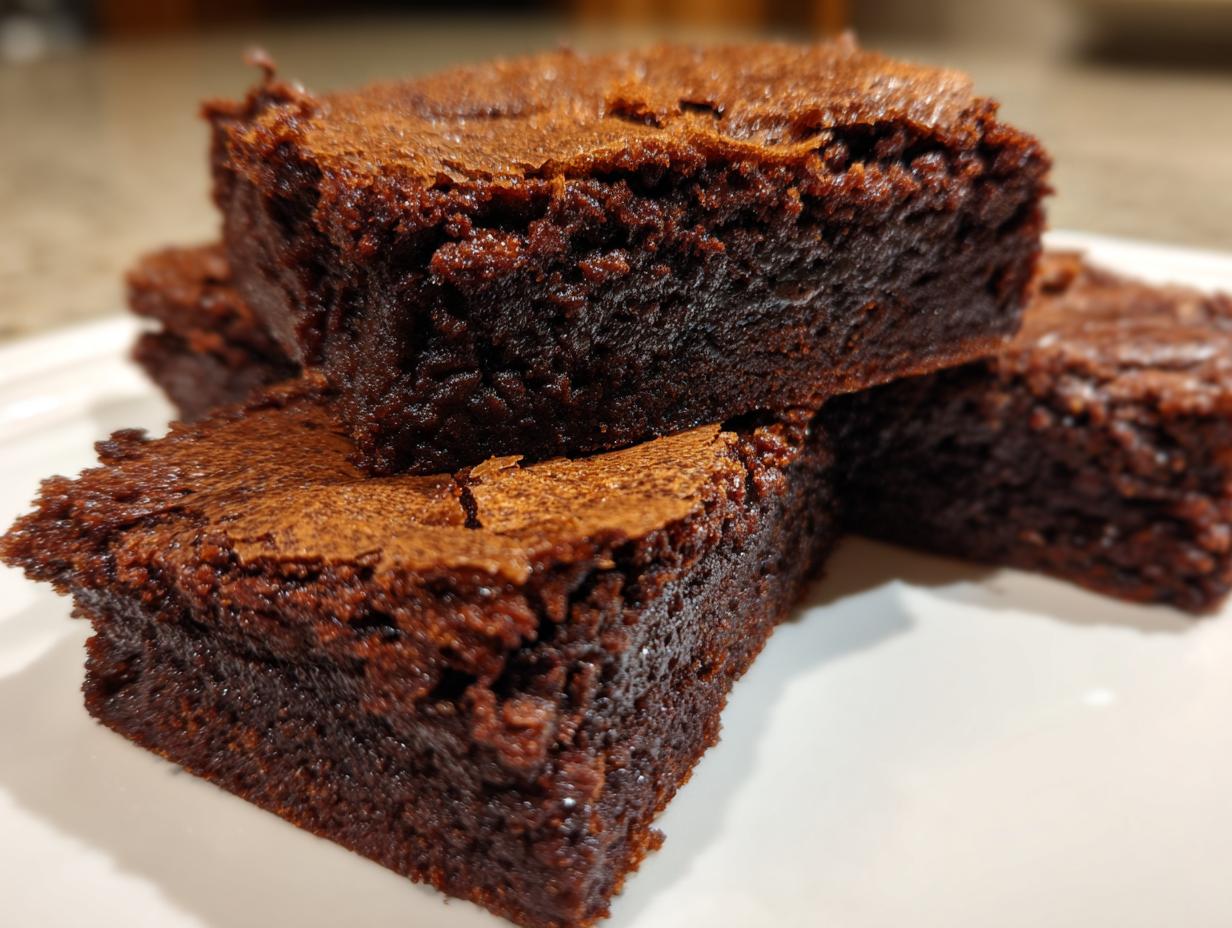
No heading needs to be written for the introduction. If you’ve ever scrolled through baking blogs wishing for something that tastes like a decadent, fudgy brownie but has the satisfying chew of your favorite oatmeal cookie, then you’ve hit the jackpot with these Chocolate Brownie Oat Bars. I started this blog because I wanted to prove you don’t need fancy equipment or hours of time to make something truly incredible. This recipe is my answer for those busy weeknights when you need a guaranteed crowd-pleaser.
I developed this recipe years ago when I was first learning to bake—it’s nearly foolproof! It uses basic pantry staples and comes together faster than you can talk yourself out of dessert. Trust me, these bars are everything: rich, chocolatey, and perfectly sturdy. They establish instant credibility in the kitchen!
Why You Will Love These Chocolate Brownie Oat Bars
I promise you, these Chocolate Brownie Oat Bars are going straight into your regular rotation. They nail that sweet spot between a satisfyingly hearty snack and a truly decadent dessert. I keep coming back to this recipe because it’s just so reliable, even on my busiest days!
- They whip up in less than 15 minutes of actual work—you can have the pan in the oven before the kettle finishes boiling!
- The texture is absolutely unreal; it’s that perfect marriage of fudgy depth and satisfying chewiness.
- They use simple ingredients you probably already have hanging out in your pantry right now.
Quick Prep and Baking Times
Seriously, speed is the name of the game here. You’re looking at just 10 minutes of prep time before this beauty goes into the oven. And then, bam, 30 minutes later, you have warm, incredible chocolate bars waiting for you. It’s faster than ordering delivery, I swear!
Chewy Texture Meets Rich Chocolate Flavor
This is the magic part! You get the dense, almost fudgy layer that melts in your mouth, thanks to that cocoa powder, sitting right on top of a slightly heartier, chewy oat base. It’s the best of both worlds, and it keeps the bars from being too heavy. That contrast is what makes these Chocolate Brownie Oat Bars so addictive.

Essential Ingredients for Perfect Chocolate Brownie Oat Bars
To get those incredible, rich results in our Chocolate Brownie Oat Bars, we need to pay attention to what goes in! Good ingredients make all the difference, especially when you’re dealing with simple flavors like chocolate and oats. I always try to use good quality cocoa powder because that’s where most of the flavor is coming from. You want them chewy, not cakey, and the right ratios here are key to achieving that perfect texture.
Dry Components Breakdown
When you’re measuring the dry stuff, please be careful! Especially with the flour and the cocoa powder. Spoon the flour into your measuring cup and then level it off with a knife—don’t just scoop it out, or you’ll end up with too much, and your bars will be dry. You need 1 cup of all-purpose flour, 1/2 cup of rolled oats (the old-fashioned kind works best for chew), 3/4 cup of sugar, 1/3 cup of cocoa powder, 1/2 teaspoon of baking soda, and just a tiny pinch—1/4 teaspoon—of salt to wake up all that chocolate flavor.
Wet Binders and Flavorings
Next up are the wet ingredients that pull everything together. You’ll need 1/2 cup of unsalted butter, melted down until it’s liquid. For the binder, one egg is all it takes, but make sure it’s at room temperature, please! Cold eggs sometimes shock the melted butter and make the batter look weirdly curdled. A whole teaspoon of vanilla extract rounds this out beautifully.
The Sweet Topping
We can’t forget the final flourish! For that gorgeous drizzle on top, you just need 1/3 cup of chocolate chips. Melt these separately—I usually do this in 20-second bursts in the microwave, stirring in between so they don’t burn. This extra layer of melted chocolate sets up beautifully once the bars cool down.
Equipment Needed for Your Chocolate Brownie Oat Bars
You really don’t need fancy gadgets for these, which is why I love them! Make sure you have a standard 8×8 inch baking dish ready to go. Line that dish with parchment paper first—this is non-negotiable for easy removal later! You’ll also need one large mixing bowl for combining everything and a separate little bowl for melting those chocolate chips for the drizzle.
Step-by-Step Instructions for Chocolate Brownie Oat Bars
Okay, let’s get baking! Making these Chocolate Brownie Oat Bars is super straightforward, but timing matters a bit, especially when it comes to mixing. Follow these steps exactly, and you’ll have that perfect chewy texture every single time. Remember, patience through the cooling stage is the hardest part!
Preparing the Base Batter
First things first, get your oven warmed up to 350°F (175°C). While that’s heating, grab your 8×8 inch baking dish and line it completely with parchment paper. Make sure you leave some overhang on the sides—that’s your little handle for lifting the whole thing out later! Now, grab your large bowl. We start dry: whisk together the flour, oats, sugar, cocoa powder, baking soda, and salt until everything looks uniform. No big clumps of baking soda, please! Next, pour in your wet ingredients—the melted butter, the room-temperature egg, and the vanilla extract. Now, here’s the crucial bit: mix this gently with a spatula or wooden spoon until *just* combined. You should still see a few streaks of flour, honestly. If you mix until it’s perfectly smooth, you’re overmixing, and we’ll lose that fudgy chewiness we worked so hard for!
Baking and Setting the Bars
Once you’ve mixed until just combined, scrape that thick batter into your prepared pan. Use the spatula to spread it out evenly across the bottom—it’s going to be thick, so spread gently so you don’t deflate all the air. Pop the pan into the preheated oven. We’re looking for 25 to 30 minutes of baking time. You’ll know they’re done when the edges look firm and the center looks mostly set, not wet. When you gently tap the center, it should feel solid, not jiggly. Once they look set, pull them out! Resist the urge to touch them immediately. You must let these cool completely—and I mean completely—on a wire rack before moving on. If you try to cut them warm, they will fall apart into a gooey mess!
Finishing Touches: The Chocolate Drizzle
While the bars are cooling down—which takes about an hour, depending on your kitchen—melt those reserved chocolate chips. Remember, low and slow in the microwave is the safest way to go! Once the bars are totally cool and firm, take your melted chocolate and drizzle it artfully over the top. You can use a fork or a piping bag if you’re feeling fancy, but a simple zigzag with a spoon looks wonderfully rustic. Let that chocolate set up for about 15 minutes. Then, grab those parchment paper handles and lift the whole slab out onto a cutting board. Slice them into 12 neat squares before serving. Enjoy that perfect brownie-oat texture!

Tips for Success Making Chocolate Brownie Oat Bars
Even though this recipe is super simple, there are a couple of little tricks that separate a good batch of Chocolate Brownie Oat Bars from an absolutely *amazing* batch. I’ve learned these the hard way, usually through impatience! If you follow these notes, you’ll nail that perfect texture every time and impress everyone who tries them.
Achieving the Right Chewiness
The chewiness comes from two main places: the oats and not overbaking. Make sure you’re using old-fashioned rolled oats, not the quick-cooking kind; the quick ones dissolve too much and make it cakey. Also, when you’re mixing the wet and dry ingredients, stop stirring the second the flour disappears. Overmixing develops gluten, and gluten means tough, cake-like bars instead of that dense, fudgy chew we want. And remember to watch the clock—pull them out right when they look set, not dry!
Perfect Chocolate Topping Application
Melting the chocolate for the drizzle needs a little attention. If you scorch the chips, the whole topping tastes bitter, so use short bursts in the microwave and stir well between each burst. For a really professional look, once the chocolate is melted and drizzled, I sometimes pop the whole pan into the fridge for about 10 minutes. This helps the chocolate set quickly and firmly, so when you slice those Chocolate Brownie Oat Bars, you get clean, beautiful lines instead of chocolate dragging everywhere.
Storing and Reheating Your Chocolate Brownie Oat Bars
These Chocolate Brownie Oat Bars are fantastic for making ahead of time, which is a huge win for busy cooks like us! Because they are so rich and have that lovely oat structure, they hold up really well. The key to keeping that fudgy texture is making sure they stay covered so they don’t dry out. I always bake a double batch on Sunday just so I have treats ready for the week!
Best Practices for Freshness
Always make sure the bars are completely cool before you even think about covering them, especially since that chocolate drizzle needs to be hard. Store them in a single layer if you can, separated by parchment paper, inside a truly airtight container. That keeps the air out and locks in the moisture. If you stack them, use a small sheet of wax paper between layers so the chocolate topping doesn’t glue them together!
Here is how I usually manage leftovers:
| Location | Duration | Notes |
|---|---|---|
| Room Temperature | Up to 3 days | Airtight tin is best. |
| Refrigerator | Up to 1 week | They firm up a bit when chilled. |
| Reheating | 10-15 seconds | Microwave briefly to soften the chocolate layer. |
Frequently Asked Questions About Chocolate Brownie Oat Bars
I get so many wonderful questions about these bars after people try them! It’s great to see so many of you diving into the recipe. Here are the ones I hear most often about making the best Chocolate Brownie Oat Bars.
Can I substitute the flour in these chocolate oat bars?
You certainly can try, but you have to know that the texture will change! Since this recipe relies on that flour structure holding up against the rich cocoa, switching to a gluten-free blend is your best bet if you need that option. Just make sure it’s a 1-to-1 blend. If you use something like almond flour, you’ll likely end up with a much denser, almost crumbly result, rather than the chewy bar we are aiming for.
How do I know when the bars are fully baked?
This is crucial for the texture! You aren’t looking for a toothpick to come out totally clean, because that means it’s already overbaked and will be dry. You want the toothpick to come out with moist, sticky crumbs clinging to it. Also, look at the edges—they should look set and slightly pulled away from the sides of the pan. That’s your signal to pull them out!
Can I make this recipe ahead of time?
Absolutely! In fact, I encourage it. These bars taste even better the next day once all those chocolate and oat flavors have really settled in. Make them, let them cool completely, drizzle the chocolate, let the drizzle set, and store them covered tightly at room temperature. They are perfect for meal prepping snacks for the week!
Share Your Chocolate Brownie Oat Bars Creations
I truly hope you loved whipping up these easy Chocolate Brownie Oat Bars as much as I love sharing them with you! Once you’ve sliced them up, I’d be so grateful if you could hop back here and leave a star rating. Tell me what you thought! And if you snapped a picture of your perfect squares, tag me on social media. Seeing your kitchen creations makes this whole journey worthwhile!
Print
Amazing 12 Chocolate Brownie Oat Bars
- Total Time: 40 minutes
- Yield: 12 bars 1x
- Diet: Vegetarian
Description
Make chewy, rich chocolate brownie oat bars with this simple recipe. You get a satisfying treat combining the texture of brownies with the heartiness of oats.
Ingredients
- 1 cup all-purpose flour
- 1/2 cup rolled oats
- 3/4 cup sugar
- 1/3 cup cocoa powder
- 1/2 teaspoon baking soda
- 1/4 teaspoon salt
- 1/2 cup unsalted butter, melted
- 1 egg, room temperature
- 1 teaspoon vanilla extract
- 1/3 cup chocolate chips, melted (for topping)
Instructions
- Preheat your oven to 350°F (175°C). Line a baking dish with parchment paper.
- In a large bowl, mix the flour, rolled oats, sugar, cocoa powder, baking soda, and salt.
- Add the melted butter, egg, and vanilla extract to the dry ingredients. Stir until the mixture is smooth.
- Spread the batter evenly into the prepared pan.
- Bake for 25 to 30 minutes, or until the bars are set.
- Allow the bars to cool completely.
- Drizzle the melted chocolate chips over the cooled bars.
- Slice the bars into squares before serving.
Notes
- Keep the finished bars tightly covered to maintain their softness.
- Prep Time: 10 minutes
- Cook Time: 30 minutes
- Category: Dessert
- Method: Baking
- Cuisine: American
Nutrition
- Serving Size: 1 bar
- Calories: Estimate needed
- Sugar: Estimate needed
- Sodium: Estimate needed
- Fat: Estimate needed
- Saturated Fat: Estimate needed
- Unsaturated Fat: Estimate needed
- Trans Fat: Estimate needed
- Carbohydrates: Estimate needed
- Fiber: Estimate needed
- Protein: Estimate needed
- Cholesterol: Estimate needed