Skip to content

Hi, I’m Anna! 👩🍳 Cooking is my passion, and here on Mom’s Kitchen I share simple, delicious recipes that bring joy and warmth to your table. Whether you love spending time in the kitchen or you’re just looking for easy ideas for everyday meals, I’m so happy to inspire you with my recipes. Thank you for being part of this flavorful journey! 💛
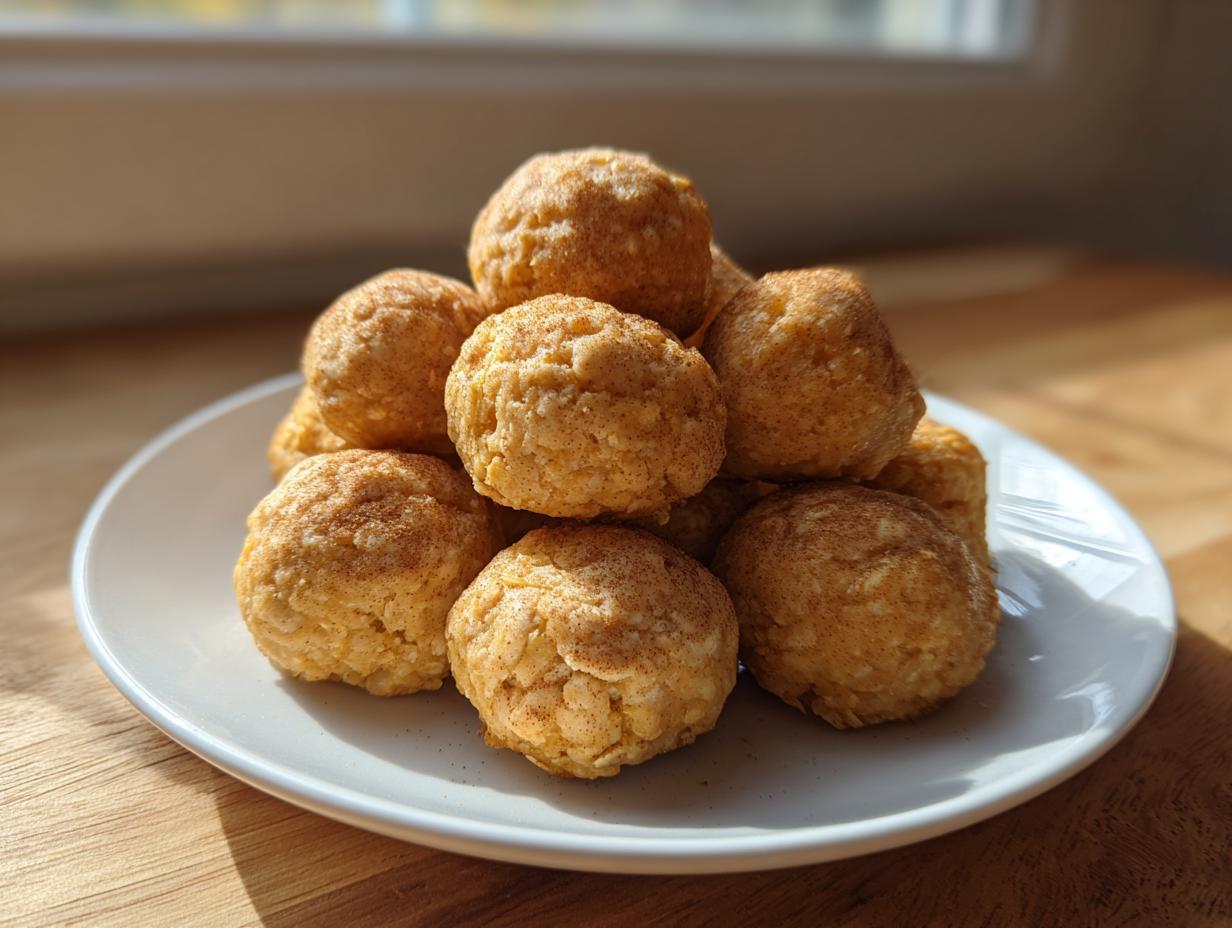
I was staring into the fridge the other day, realizing I had leftover rice from last night’s takeout, and suddenly, I *knew* what needed to happen next. We needed Crispy Fried Rice Cheese Balls! Seriously, these things are the definition of delicious transformation. Taking simple leftovers and turning them into something totally craveable is what home cooking is all about, right? These aren’t just snacks; they’re little golden bites of pure satisfaction, and I’ve perfected the technique over several messy, cheesy attempts so you don’t have to! They are absolutely perfect for game day or just when you need a quick win after work.

Why You Will Love These Crispy Fried Rice Cheese Balls
If you’re looking for an appetizer that disappears instantly, this is it. I promise you, these fried rice snacks nail that perfect contrast between gooey insides and that wonderful crunch. I’ve made sure this recipe is foolproof, even if you’ve never touched a deep fryer before! Trust me, the effort is minimal for the flavor payoff.
- They come together fast—we’re talking under 30 minutes total time!
- They use up leftover sticky rice beautifully, cutting down on waste.
- The combination of savory rice and melted mozzarella is just pure comfort food magic.
- You get that amazing crunch from the panko breadcrumbs every single time.
Gathering Your Ingredients for Crispy Fried Rice Cheese Balls
Okay, getting organized is half the battle, especially with something that cooks this quickly. We need three main stations: the rice mixture, the wet dip (the egg), and the dry crunch (the panko). Don’t stress about finding weird ingredients; this list is super simple—the real secret is making sure your rice is the right kind!
Essential Components
Grab everything on the list below! Make sure you measure out your flour, egg, and panko precisely; these coating layers are what make the cheese balls hold their shape and get that beautiful golden exterior.
Ingredient Notes and Substitutions for Crispy Fried Rice Cheese Balls
The most important thing here is the rice. Please, please use sticky rice (sushi rice works great too). Regular, fluffy white rice will just fall apart when you try to roll it. If you’re worried about frying oil, avocado oil is my go-to because it has a high smoke point, but canola oil works just as well. Since this is vegetarian, there are no meat substitutes to worry about, just keep that mozzarella nice and shredded!
Essential Equipment for Perfect Crispy Fried Rice Cheese Balls
You don’t need a ton of fancy gadgets for these little guys, which is why they are so easy! Just grab a couple of standard mixing bowls—one for your rice mixture and one for the egg wash. You absolutely need three shallow plates or dishes set up side-by-side for the dredging station. And finally, decide on your cooking method: either your air fryer or a sturdy frying pan for shallow frying. That’s it, promise!
Step-by-Step Instructions for Crispy Fried Rice Cheese Balls
Now for the fun part! This process is really quick once you get into the rhythm of rolling and coating. Remember, we are moving fast with the coating, but we need patience with the chilling step—that’s the secret handshake for keeping these balls intact!
Preparing the Rice and Cheese Mixture
First things first, grab your bowl. You want to combine that cooked sticky rice with your shredded mozzarella. Here’s a little trick I learned: mix this while the rice is still pleasantly warm. The warmth helps melt the cheese just enough so it binds beautifully with the rice grains. Mix it really well until the cheese is evenly distributed. Once combined, start rolling! Aim for small, uniform balls—about the size of a golf ball, maybe a little smaller. Pop these formed balls onto a plate or tray and get them into the fridge. They need at least 15 minutes to chill completely. This cooling time solidifies the cheese and rice so they don’t ooze out when you start frying!

The Three-Step Coating Process
While those babies are chilling, set up your dredging station. You need three shallow dishes lined up in this exact order: Flour first, then the beaten egg, and finally, those wonderful panko breadcrumbs. Take a chilled ball and gently roll it in the flour. You want a nice light dusting, so give it a good shake to get rid of any excess flour—too much flour makes the coating gummy. Next, dip it into the egg, letting any drips fall back into the dish. The egg is our glue! Finally, roll that ball aggressively in the panko. Press the crumbs onto the surface gently to make sure every single spot is covered. That thick panko jacket is what gives us the crunch!
Cooking Methods: Air Frying vs. Shallow Frying Crispy Fried Rice Cheese Balls
Once coated, it’s time for the heat! If you’re air frying (my favorite low-mess route), give those balls a light spritz with cooking spray or avocado oil—don’t skip the spray! Set your air fryer to 400 degrees Fahrenheit and let them cook for about 7 minutes. Check them around the 5-minute mark; you want them golden brown and crispy all over. If you’re shallow frying, heat about an inch of oil in a pan until it’s hot (a little piece of bread should sizzle right away). Carefully place the balls in the hot oil, making sure not to overcrowd the pan. Fry them for just 2 to 3 minutes, turning gently, until they hit that perfect golden color. Either way, pull them out and let them drain briefly on a paper towel before serving them piping hot!
Tips for Achieving Maximum Crispiness in Your Crispy Fried Rice Cheese Balls
Listen, the difference between a good cheese ball and a spectacular one is all in the texture. We want that satisfying crackle when you bite into it, right? My number one, non-negotiable pro-tip is making sure those formed rice and cheese balls are thoroughly chilled before they ever see the coating station. If they are warm, that mozzarella melts too fast, and you end up with messy coating and sad, deflated balls!
Also, don’t skimp on the panko! Regular breadcrumbs just don’t give you the same airy crunch. Always use fresh panko if you can. Another small thing: when you drain them after frying or air frying, make sure you use a wire rack over a paper towel if possible. Letting them sit directly on a flat paper towel can trap steam, and steam is the enemy of crispiness!
Serving Suggestions for Crispy Fried Rice Cheese Balls
These savory little bites are fantastic all on their own, but they really sing when paired with a good dipping sauce. I always keep a bowl of sweet chili sauce handy; the sweetness cuts through the richness of the cheese perfectly. If you like a little tang, a simple sriracha mayo is incredible—just mix mayo with a dollop of sriracha and a squeeze of lime juice. They are great as a starter or just a fun afternoon snack!
Storage and Reheating Instructions for Crispy Fried Rice Cheese Balls
Oops! Did you make too many? Don’t worry; these Crispy Fried Rice Cheese Balls store surprisingly well, but you have to treat them right to keep that crunch alive. Once they are completely cooled down—and I mean totally cool, not even warm—put them in an airtight container. Never store them in the fridge for more than two days, though, because the rice can start to dry out.
The key is reheating them properly. Do not microwave them unless you enjoy soft cheese balls! The oven or air fryer is your best friend here to bring back that glorious crispiness. If you want to learn more about the science behind keeping fried foods crispy, check out this guide to achieving maximum crispiness.
| Storage Method | Duration | Best Reheating Method |
|---|---|---|
| Airtight Container | Up to 2 days | Air Fryer (350°F for 4 minutes) |
Frequently Asked Questions About Crispy Fried Rice Cheese Balls
I get so many great questions about these little gems! Most people are worried about them falling apart, which is totally understandable when you mix hot rice and melty cheese. Don’t fret; I’ve got the answers to the most common issues folks run into when making these fried rice snacks.
Q1. My cheese balls came out flat after cooking. What went wrong?
That usually means your mixture wasn’t cold enough when you coated them, or you didn’t use sticky rice. If the cheese is too soft going into the oil, it melts out before the coating sets. Make sure you chill those rolled balls for a solid 15 minutes after rolling, just like I mentioned in the instructions!
Q2. Can I make these ahead of time?
Yes, you absolutely can! This is a great make-ahead appetizer. You can form the rice and cheese balls, coat them completely in the panko, and freeze them on a baking sheet until solid. Once frozen, transfer them to a freezer bag. When you’re ready to cook, just add a few extra minutes to your air fry or shallow fry time. They freeze beautifully!
Q3. Can I use white rice instead of sticky rice?
I really, really advise against it. Regular white rice is too loose, and it won’t hold the ball shape. You need the starchiness of sticky rice (or sushi rice) to act as the binder. If you use regular rice, you might end up with a cheesy rice puddle instead of perfect fried rice cheese balls. For more information on different types of rice and their uses, you can consult a resource like the USA Rice Federation.
Q4. Do I have to use mozzarella?
Mozzarella is my favorite because it stretches so nicely, giving you that amazing cheese pull! But if you want a little more flavor, you can substitute half of the mozzarella with sharp cheddar or Monterey Jack. Just make sure whatever cheese you use is well-shredded so it mixes evenly with the rice.
Share Your Delicious Crispy Fried Rice Cheese Balls Creations
I just love seeing your kitchen creations! If you tried these incredible Crispy Fried Rice Cheese Balls, please pop back here and leave a star rating—it helps other home cooks find the best recipes. And if you snapped a picture of those golden bites, tag me on social media! I want to see your perfect crunch and gooey cheese pull! If you’re interested in learning more about my cooking philosophy, feel free to check out my About Me page.
Print
Amazing 30-min Crispy Fried Rice Cheese Balls
- Total Time: 22 minutes
- Yield: About 12 balls 1x
- Diet: Vegetarian
Description
Crispy Fried Rice Cheese Balls. These balls combine savory rice with melted cheese, coated in crunchy breadcrumbs for a satisfying snack or appetizer. You cook them until golden brown and serve them hot.
Ingredients
- 1 1/2 cups cooked sticky rice
- 1/2 cup shredded mozzarella
- 3 tbsp flour
- 1 egg, beaten
- 3/4 cup panko breadcrumbs
- Cooking spray or avocado oil
Instructions
- Mix the cooked sticky rice and shredded mozzarella cheese together in a bowl.
- Roll the rice and cheese mixture into small, uniform balls.
- Set up three shallow dishes: one with flour, one with the beaten egg, and one with the panko breadcrumbs.
- Dredge each rice ball first in the flour, shaking off any excess.
- Dip the floured ball into the beaten egg, allowing excess to drip off.
- Roll the ball thoroughly in the panko breadcrumbs until fully coated.
- If air frying, lightly spray the coated balls with cooking spray.
- Air fry at 400°F for 7 minutes, or until crispy and golden.
- Alternatively, shallow fry in hot oil until the exterior is crisp.
- Serve the Crispy Fried Rice Cheese Balls warm.
Notes
- Use rice that is warm when mixing with the cheese, then chill the formed balls before coating and cooking.
- Prep Time: 15 minutes
- Cook Time: 7 minutes
- Category: Appetizer
- Method: Air Fry or Shallow Fry
- Cuisine: Fusion
Nutrition
- Serving Size: 2 balls
- Calories: 180
- Sugar: 1g
- Sodium: 250mg
- Fat: 7g
- Saturated Fat: 3g
- Unsaturated Fat: 4g
- Trans Fat: 0g
- Carbohydrates: 22g
- Fiber: 1g
- Protein: 8g
- Cholesterol: 45mg