Skip to content

Hi, I’m Anna! 👩🍳 Cooking is my passion, and here on Mom’s Kitchen I share simple, delicious recipes that bring joy and warmth to your table. Whether you love spending time in the kitchen or you’re just looking for easy ideas for everyday meals, I’m so happy to inspire you with my recipes. Thank you for being part of this flavorful journey! 💛
When I first started baking, I was terrified of anything that involved more than three ingredients. Seriously! I burned cookies, I over-mixed cakes, and I thought anything with a ‘drizzle’ was strictly professional territory. It took me years to realize that the best recipes aren’t complicated; they’re just clear. That’s why I created this space—to break down intimidating desserts into totally doable steps. You don’t need fancy tools or years of experience to make something incredible. Learn more about my baking philosophy here.
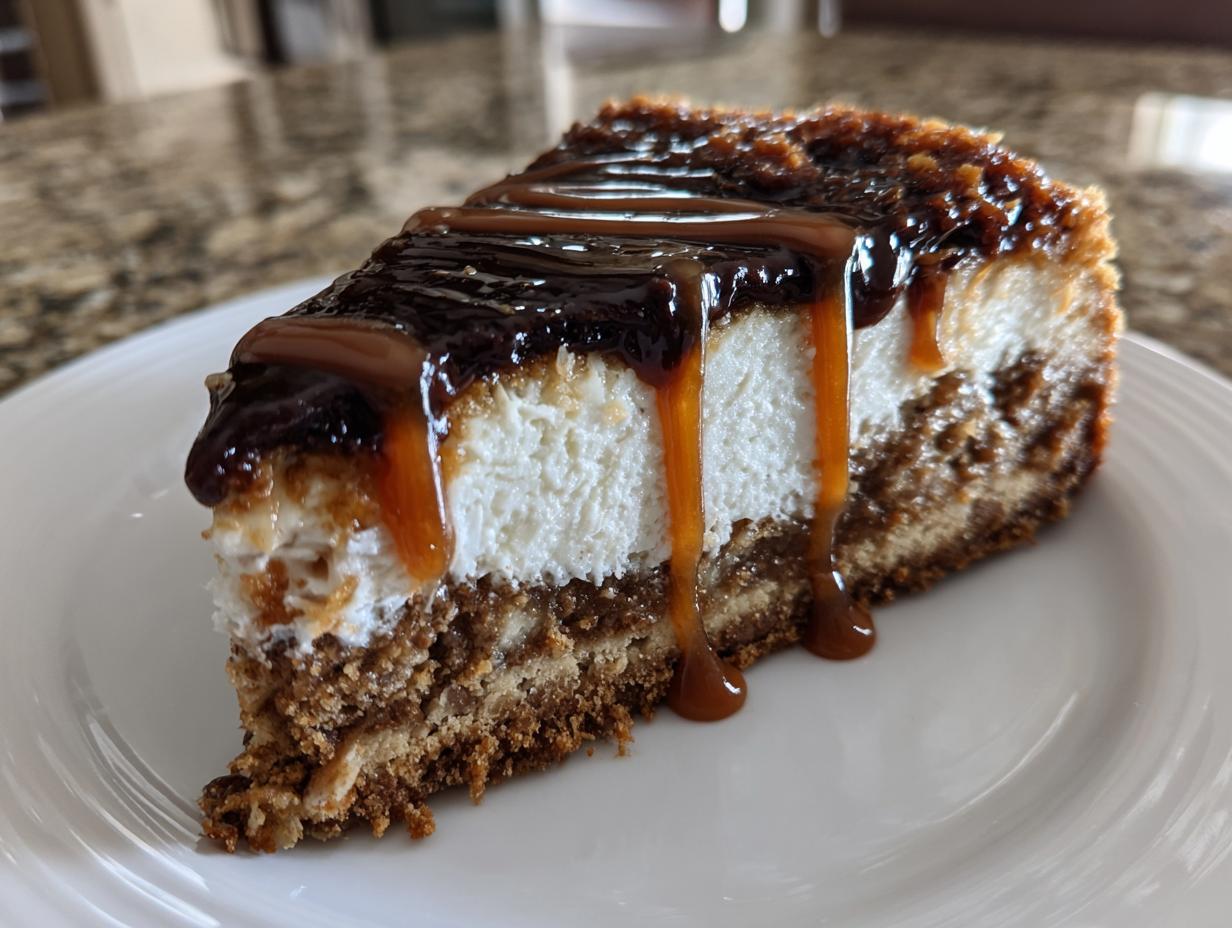
And trust me, these Salted Caramel Apple Bars are proof! They have that perfect chewy base, those tender chunks of spiced apple, and the salty-sweet caramel topping that makes you close your eyes when you take a bite. If you’ve ever wanted to make a show-stopping autumn dessert without needing a pastry degree, this is the recipe you’ve been waiting for. We’re going to tackle this together, step-by-step!
Gathering Your Ingredients for Salted Caramel Apple Bars
Before we dive into the mixing bowl, let’s make sure we have everything ready to go! When I started baking, I learned quickly that having all my ingredients measured out beforehand—what the fancy chefs call *mise en place*—saved me so much stress. For these Salted Caramel Apple Bars, organization is key because the base comes together super fast. You’ll notice we have a few distinct groupings of ingredients, which helps keep the process smooth.
Don’t panic about the list; it’s mostly pantry staples with a few fresh additions. The beauty of this recipe is that once you mix the base, the apples go right in, and it’s off to the oven. Just make sure everything is measured accurately, especially the salt, since we use it twice!
Essential Components for the Base and Topping
Here is exactly what you need to pull together these amazing bars. I like to measure the brown sugar packed right into the cup—that’s important for the chewiness!

| Component | Ingredient | Quantity |
|---|---|---|
| Dry Base | All-purpose flour | 1 cup |
| Dry Base | Rolled oats | 1/2 cup |
| Dry Base | Brown sugar | 1/2 cup (packed) |
| Dry Base | Salt | 1/4 teaspoon |
| Dry Base | Cinnamon | 1/2 teaspoon |
| Wet/Binder | Unsalted butter | 1/2 cup (melted) |
| Wet/Binder | Egg | 1 |
| Wet/Binder | Vanilla extract | 1 teaspoon |
| Filling | Chopped apples | 1/2 cup |
| Topping | Caramel sauce | 1/4 cup |
| Topping | Sea salt | 1/4 teaspoon |
| Optional Topping | Chopped pecans | 1/4 cup |
Ingredient Notes and Substitutions for Salted Caramel Apple Bars
A few quick notes on ingredients that really make a difference in your final product. When it comes to the apples, please, please use firm ones! Softer apples like McIntosh tend to turn to mush when baked. Granny Smith or Honeycrisp work beautifully here. If you don’t have pecans on hand for the top of your Salted Caramel Apple Bars, walnuts are a perfectly fine swap, or you can just skip them entirely if you’re keeping things nut-free.
Also, the caramel sauce needs to be the thick, pourable kind, not the thin liquid used for ice cream toppings, or it might soak in too much. We want that beautiful drizzle on top! Learning to make homemade caramel sauce can elevate this even further.
Equipment Needed for Perfect Salted Caramel Apple Bars
You don’t need a huge arsenal of gadgets for these bars, which is why I love them for busy weeknights! We are keeping things simple here. The most important item is your baking vessel. You’ll need a standard 9×9 inch square baking dish. Make sure you have some parchment paper handy, too—this is my secret trick for getting those perfect squares out without breaking them!
You’ll also need a couple of mixing bowls—one for the dry stuff and one to bring everything together. A sturdy rubber spatula for folding in the apples is helpful, and of course, measuring cups and spoons. That’s it! No stand mixer required for this recipe; a simple spoon or whisk works just fine for combining the base.
Step-by-Step Instructions for Salted Caramel Apple Bars
Alright, let’s get baking! This is where the magic happens, and honestly, it moves fast once you get going. We’re aiming for those wonderfully chewy Salted Caramel Apple Bars, and the timing of mixing and cooling is what makes the difference between a gooey mess and a perfect square.
Preparing the Base Mixture
First things first: get your oven fired up to 350°F (175°C). While that’s warming up, grab your 9×9 inch baking dish. I always use parchment paper here, letting it hang over two sides like little handles—this makes lifting the whole thing out later a breeze! You won’t regret doing this prep work.
In a medium bowl, whisk together all your dry base ingredients: the flour, oats, that packed brown sugar, the cinnamon, and the first bit of salt. Get them nicely combined so there are no clumps of sugar floating around.
Now for the wet stuff. In a separate, slightly smaller bowl—or even a large measuring cup—mix your melted butter, the single egg, and the vanilla extract. Pour this wet mixture right into the dry ingredients. Mix it with a spoon or spatula until it is *just* combined. Don’t overmix! A few streaks of flour are fine at this stage.
Finally, gently fold in your 1/2 cup of chopped apples. You want to treat them gently so they don’t break down too much. We want chunks of apple in the finished bar, not apple mush!
Baking and Cooling the Apple Bars
Once the base batter is ready, spread it out evenly in that parchment-lined pan. Press it down firmly so you get a nice, dense layer—this is crucial for that chewy texture we love. Slide it into the preheated oven.
Bake these beauties for about 25 to 30 minutes. Keep an eye on the edges; they should look golden brown and set up nicely. Don’t be tempted to pull them out early! If you check them at 25 minutes, you’re looking for the center to look mostly set, not wet.
This next step is the hardest part, but you absolutely must follow it: Let the bars cool completely. I mean *completely*. If you try to drizzle caramel on warm bars, it melts right into the crust and you lose that beautiful salty-caramel layer on top. Seriously, let them sit on the counter for at least an hour, or chill them in the fridge for 30 minutes if you’re impatient like me!

Applying the Salted Caramel Drizzle
Once they are stone cold, it’s topping time! Take your 1/4 cup of caramel sauce. If it’s too stiff to drizzle nicely, microwave it for about 10 to 15 seconds—just until it flows easily off a spoon. Drizzle it artfully all over the top of the cooled bars. Don’t worry about making perfect lines; messy looks rustic and delicious!
Right away, while the caramel is still sticky, sprinkle that remaining 1/4 teaspoon of sea salt evenly over the top. If you’re using pecans, sprinkle those on now too. The salt needs that wet caramel layer to stick!
Now, you can lift the parchment sling right out of the pan. Use a sharp knife to slice them into 9 nice squares. If the knife sticks a little, just wipe it clean between cuts. Enjoy the best Salted Caramel Apple Bars you’ve ever made! For tips on knife safety, check out general kitchen safety guidelines.
Tips for Success Making Salted Caramel Apple Bars
These bars are nearly foolproof, but a few little tricks I’ve picked up over the years can take them from good to absolutely legendary. My main focus when making Salted Caramel Apple Bars is always achieving that perfect textural contrast—chewy base, soft apple, firm topping.
First tip: Don’t skimp on pressing that base layer into the pan! If you leave it too light, it bakes up crumbly instead of chewy. Really press it down firmly with the back of a measuring cup before it goes into the oven. You want density!
Second, remember the cooling rule for the caramel. If you rush cooling, the caramel melts straight through to the bottom, and you end up with a sticky mess instead of a beautiful drizzle. Totally worth the wait—trust me on this one!
Finally, when you sprinkle the sea salt, do it immediately after the caramel goes on. If you wait even a minute, the caramel starts to set up, and the salt won’t adhere properly. A little bit of timing makes all the difference in the final presentation and flavor burst!
Frequently Asked Questions About Salted Caramel Apple Bars
I get so many questions about these bars because everyone wants that perfect texture! Here are the top things folks ask when they are making their first batch of Salted Caramel Apple Bars.
Q1. How can I make sure my bars are extra chewy and not cakey?
That chewiness comes from two places: pressing the base down firmly before baking, and using brown sugar instead of white. The molasses in the brown sugar keeps things moist and dense. If you want even chewier edges, make sure your oven temperature is accurate; running too cool can lead to a softer, less set bar.
Q2. What if I don’t have sea salt? Can I use regular table salt on the caramel?
You absolutely can, but you need to cut back! Table salt is much stronger than flaky sea salt. If you use the full 1/4 teaspoon of table salt, your caramel bars might be too much! I would start with just 1/8 teaspoon of table salt sprinkled over the caramel, and taste it before adding more.
Q3. Can I use applesauce instead of fresh chopped apples?
I wouldn’t recommend it for this specific recipe. Applesauce is already cooked down and adds moisture differently than fresh chunks. If you use applesauce, your base will be much wetter, and you risk having a soggy crust that won’t set up right. Stick to firm, fresh chopped apples for the best results in these apple dessert bars.
Q4. My caramel sauce is too thick to drizzle after the bars cooled. Now what?
This happens sometimes, especially if your caramel sauce was refrigerated! Don’t try to force it with a spoon—you’ll just tear up your beautiful cooled bars. Just put the whole jar (or a small amount in a microwave-safe bowl) in the microwave for 10 to 15 seconds. It should become perfectly drizzly again. Remember, you need that liquid consistency for the perfect salted caramel drizzle!
Q5. Can I use walnuts instead of pecans?
Yes, walnuts are a fantastic substitute for the optional pecans on top of these autumn dessert bars! Honestly, any chopped nut you like will work just fine. If you’re making them for someone with allergies, just skip them altogether; the bars are delicious even without any nuts on the topping.
Storing Your Homemade Salted Caramel Apple Bars
Now that you’ve made these incredible Salted Caramel Apple Bars, the next big question is how to keep them tasting fresh! The good news is that because of the butter and the caramel topping, these bars stay moist for quite a while. I usually keep mine right on the counter because they are so stable, but airtight storage is always best to prevent them from drying out or picking up any weird fridge smells.
I find that if you cut them *after* they are completely cool and topped, they store much better than if you try to store the whole slab. If you plan on keeping them for more than a couple of days, wrapping individual squares tightly in plastic wrap before putting them in a container is the way to go. They are great at room temperature, but if your kitchen is really warm, the fridge keeps that caramel topping nice and firm.
| Storage Location | Duration | Notes |
|---|---|---|
| Countertop (Airtight) | Up to 3 days | Best for immediate snacking; room temperature is great for chewiness. |
| Refrigerator | Up to 5 days | Keeps the caramel firm; let sit for 15 minutes before serving. |
| Freezer | Up to 2 months | Wrap tightly first. Thaw overnight on the counter. |
Sharing Your Salted Caramel Apple Bars Creations
I hope you loved making these easy, decadent Salted Caramel Apple Bars as much as I love sharing them! Once you’ve had a chance to try them, I’d be so grateful if you’d come back and leave a rating. Let me know how they turned out for you! Contact me with your feedback.
Sharing Your Salted Caramel Apple Bars Creations
I hope you loved making these easy, decadent Salted Caramel Apple Bars as much as I love sharing them! Once you’ve had a chance to try them, I’d be so grateful if you’d come back and leave a rating. Let me know how they turned out for you!
Print
Amazing 9 Salted Caramel Apple Bars
- Total Time: 45 minutes
- Yield: 9 servings 1x
- Diet: Vegetarian
Description
Make delicious Salted Caramel Apple Bars with a chewy base and sweet, salty topping.
Ingredients
- 1 cup all-purpose flour
- 1/2 cup rolled oats
- 1/2 cup brown sugar
- 1/4 teaspoon salt
- 1/2 teaspoon cinnamon
- 1/2 cup unsalted butter (melted)
- 1/2 cup chopped apples
- 1 egg
- 1 teaspoon vanilla extract
- 1/4 cup caramel sauce
- 1/4 teaspoon sea salt
- 1/4 cup chopped pecans (optional)
Instructions
- Preheat oven to 350°F (175°C). Line a 9×9 inch baking dish with parchment paper.
- In a bowl, mix flour, oats, brown sugar, salt, and cinnamon.
- Add melted butter, egg, and vanilla extract to the dry ingredients. Mix until just combined.
- Gently fold in the chopped apples.
- Spread the mixture evenly into the prepared baking dish.
- Bake for 25 to 30 minutes, or until the edges are golden brown.
- Let the bars cool completely.
- Drizzle the caramel sauce over the cooled bars.
- Sprinkle with sea salt and optional chopped pecans.
- Cut into squares and serve.
Notes
- Use firm apples for better texture in the bars.
- Ensure bars are completely cool before adding the caramel topping for a cleaner drizzle.
- Pecans are optional; substitute with walnuts or omit for a nut-free version.
- Prep Time: 15 minutes
- Cook Time: 30 minutes
- Category: Dessert
- Method: Baking
- Cuisine: American
Nutrition
- Serving Size: 1 bar
- Calories: 250
- Sugar: 20g
- Sodium: 150mg
- Fat: 14g
- Saturated Fat: 8g
- Unsaturated Fat: 6g
- Trans Fat: 0g
- Carbohydrates: 30g
- Fiber: 2g
- Protein: 3g
- Cholesterol: 40mg